目次
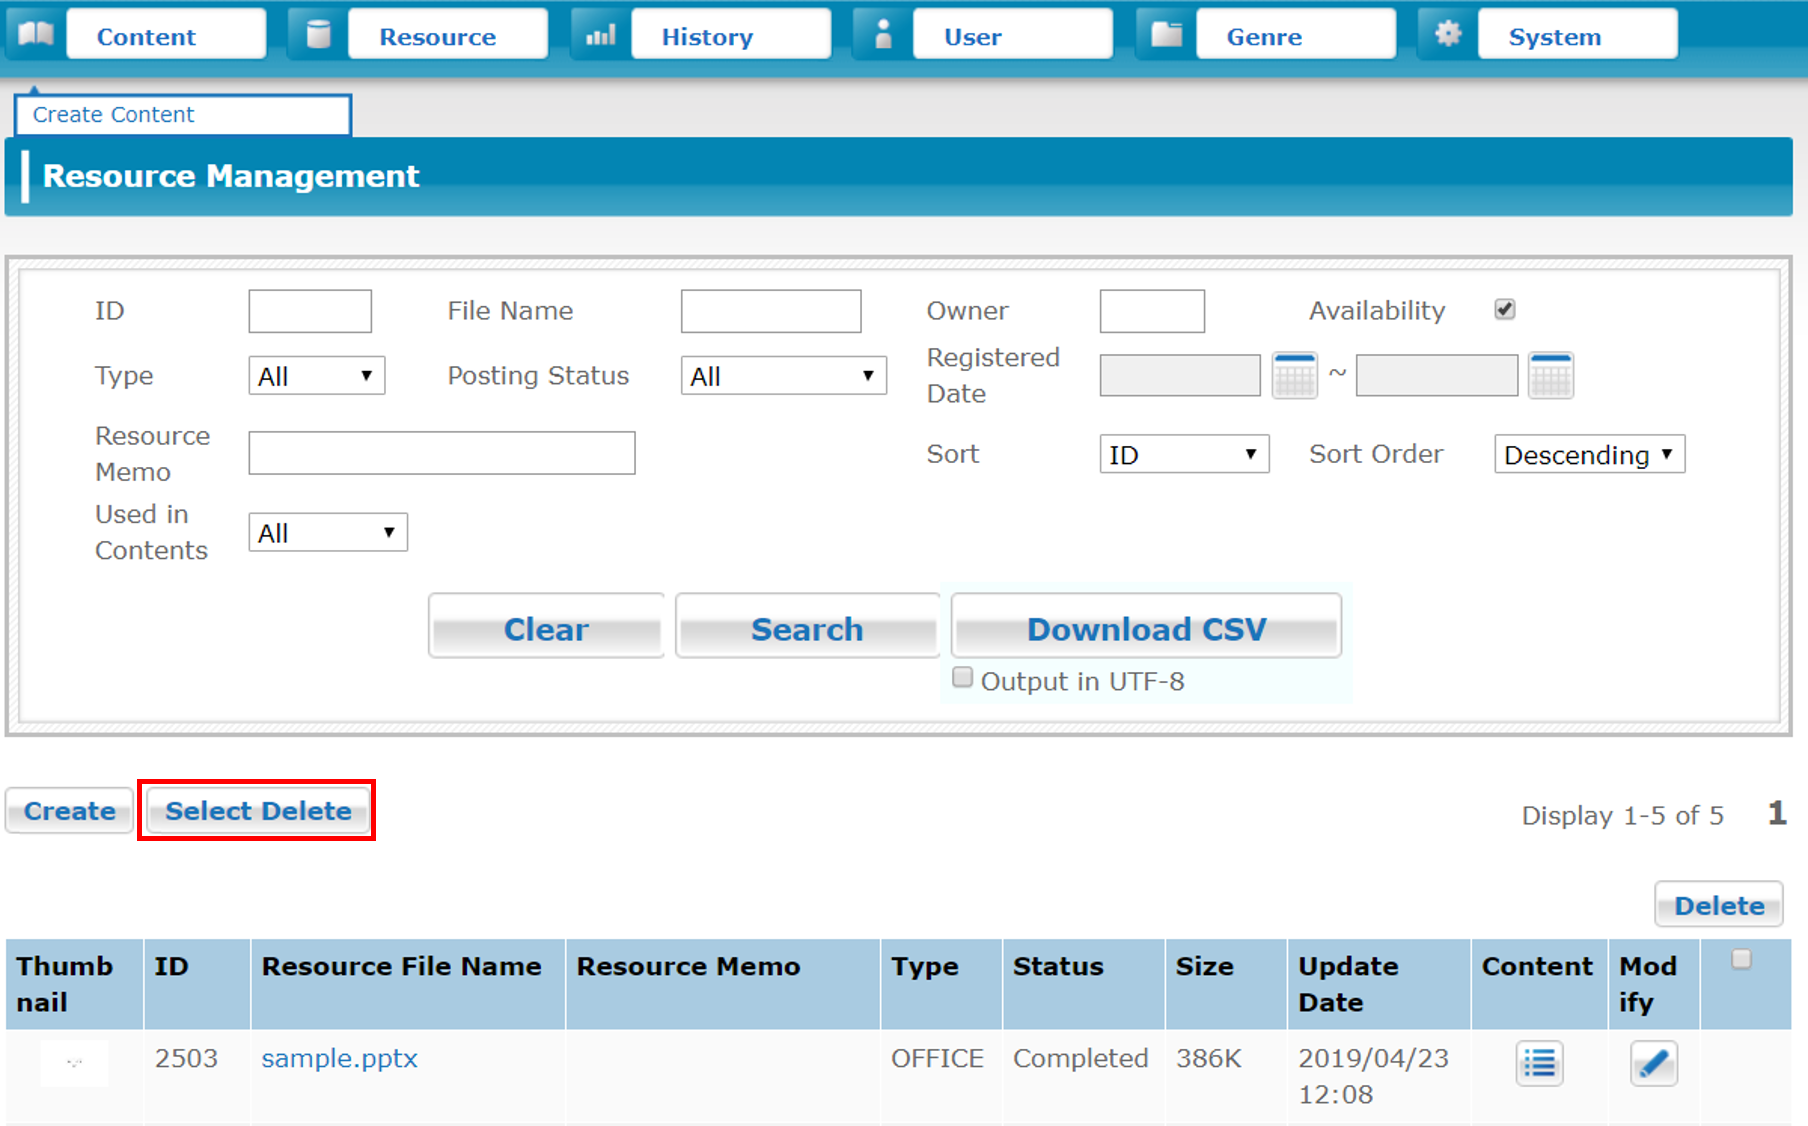
5.1 Resource Management
You can manage resources used for creating and authoring (editing) content on a list. You can perform operations only for resources that you have an authority to use.
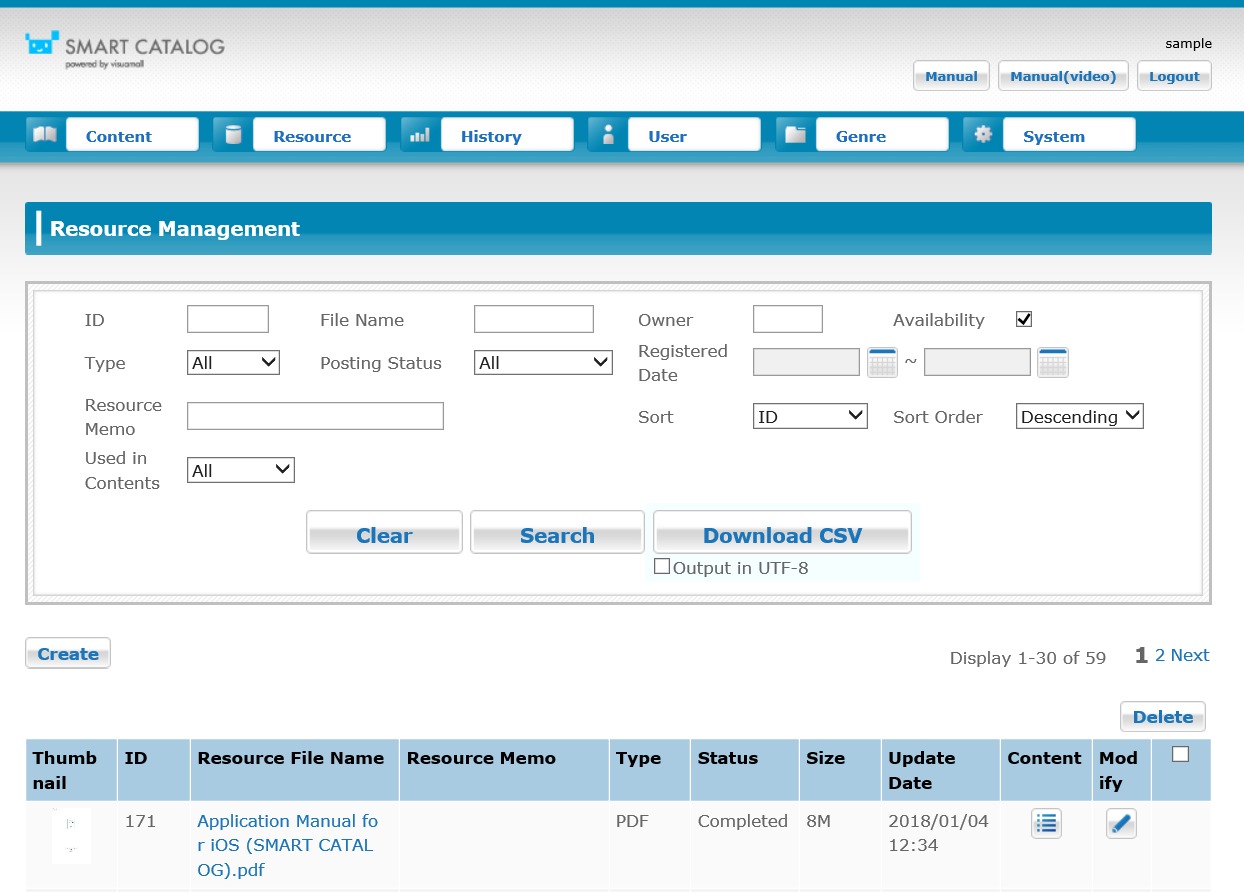
● Resource search area
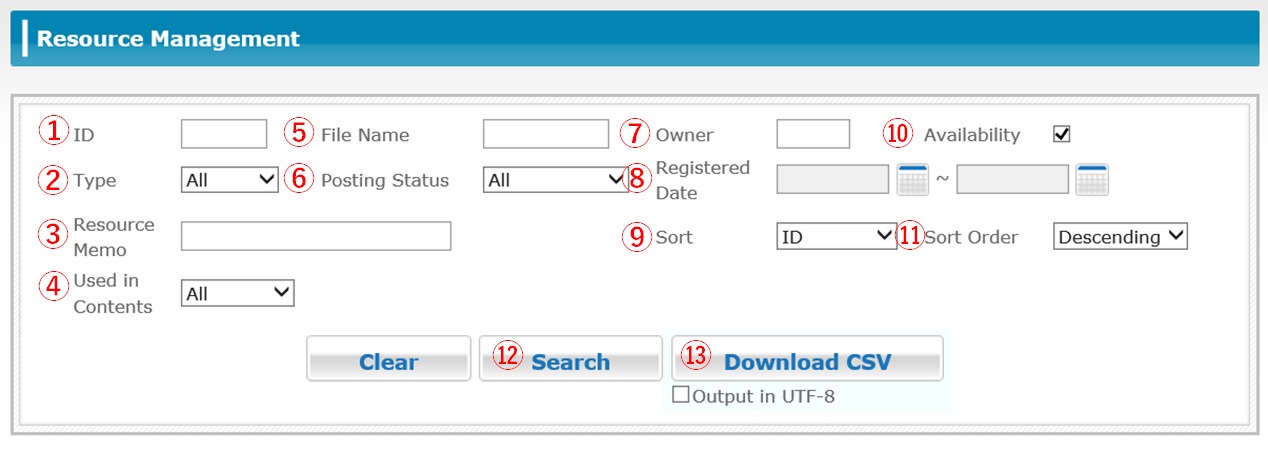
| ① | ID | You can search resources by their resource ID. |
| ② | Type | You can search resources by specifying the type. |
| ③ | Resource Memo | You can search memo information registered for resources. |
| ④ | Used in Contents | You can search to find out whether or not specific resources are used in a content. |
| ⑤ | File Name | You can search resources by their original file name. |
| ⑥ | Posting Status | You can search resources by their registration status. |
| ⑦ | Owner | You can search resources by the person who created them. |
| ⑧ | Registered date | You can search resources by the date that the resource was created by specifying a period in "Create Date." |
| ⑨ | Sort | Select the item to be used for sorting. |
| ⑩ | Availability | Resources of which status is usable or unusable are searched. |
| ⑪ | Sort Order | Select the ascending order/descending order for the item selected for "Sort." Click the [Search] button. Contents that match the search conditions are displayed in the [Resource Management] screen in the order specified for "Sort Order." |
| ⑫ | Search button | It starts search based on the entered conditions. When there are resources matching the search conditions, they are displayed in the [Resource Management] screen. |
| ⑬ | Download CSV button | You can check information about multiple resources at one time on a CSV file. |
■Explanation about the format of a downloaded CSV file (resource information)
| Column | Name | Details |
|---|---|---|
| ResourceID | ResourceID | |
| ResourceFileName | Resource file name | |
| ResourceMemo | Resource memo | |
| ResourceType | Resource type | |
| AllGroup | Used by all groups | Y: Can be used by all groups N: Cannot be used by all groups |
| Group | Target groups to release the content | |
| UsageStatus | Usage Status | Y: Can be used N: Cannot be used |
| Status | Status | |
| Size | Size | |
| Owner | Registered user | |
| RegisteredDate | Registration date | YYYY/MM/DD HH24:MI:SS |
| UpdateDate | Update Date | YYYY/MM/DD HH24:MI:SS |
| UseTheContent | Use The Content | Y: Used N: Unused |
| DelFlg | Delete flag | N:Default(Not subject to delete)、Y:Subject to delete |
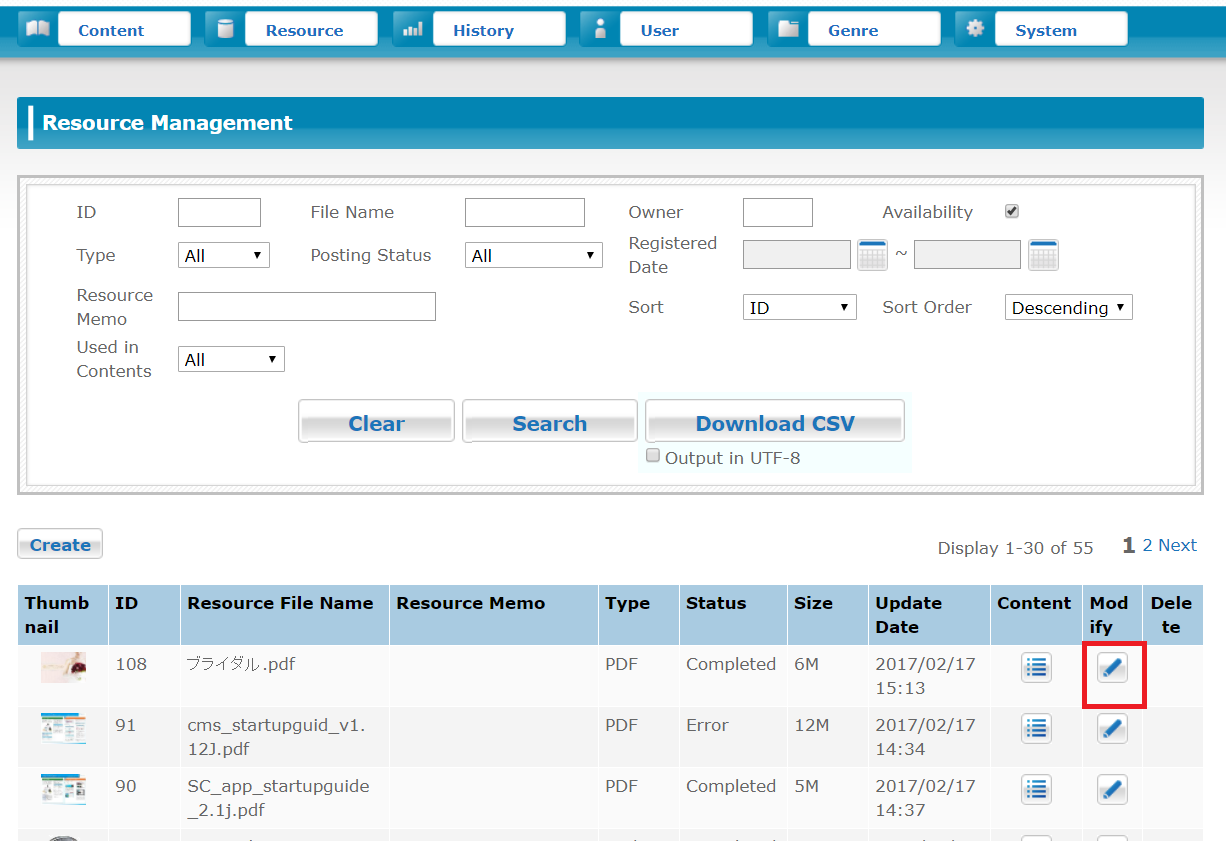
● Resource List
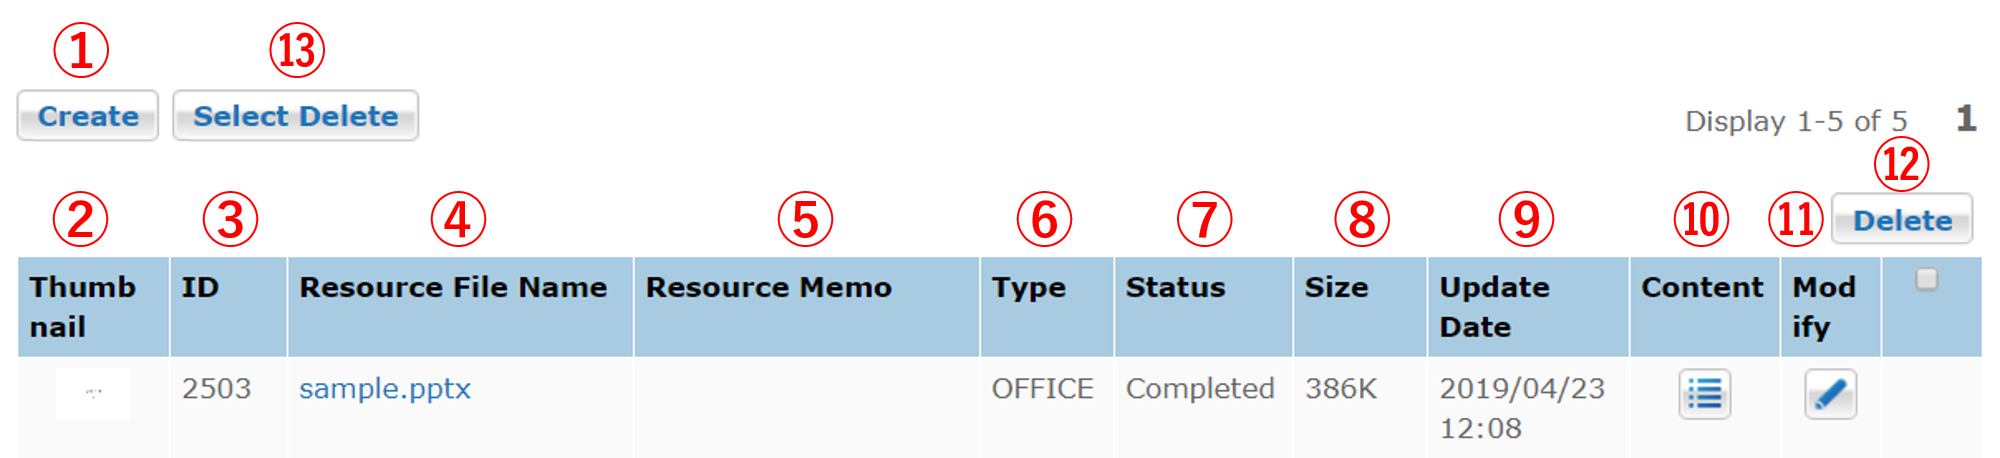
| ① | Create Button | It displays the [Register Resource] screen. |
| ② | Thumbnail | Images automatically extracted by the system during creation are displayed as a thumbnail of resources. Some resources cannot be displayed as an image. |
| ③ | ID | The control ID of the resource is displayed. |
| ④ | Resource File Name | The original file name of the resource is displayed. |
| ⑤ | Resource Memo | The memo entered during the creation of the resource is displayed. |
| ⑥ | Type | The type of the resource file is displayed. |
| ⑦ | Status | The status of the registration of the resource is displayed. |
| ⑧ | Size | The size of the resource file is displayed. |
| ⑨ | Update Date | The date when the resource was updated is displayed. |
| ⑩ | Content | A list of contents that the resource is used for is displayed. |
| ⑪ | Modify | It modifies the resource information. |
| ⑫ | Delete | It deletes all of the selected resources. |
| ⑬ | Select Delete Button | Display "Resource Select Delete" Screen. |
Memo
・If the target resource is used in content, the resource cannot be deleted unless the content is deleted.
・If you select the content button, which locates at the right side of the resource list, a list of contents which use that resource will be displayed, so please delete it over again after releasing it from all contents.
・If the same resources under the same file name are created separately, they are handled as different resources
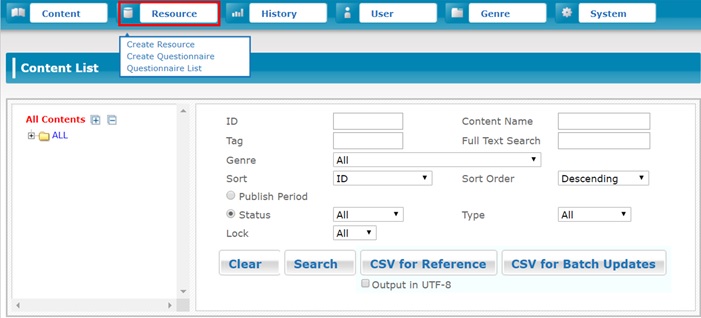
5.2 Creating Resourcem from the Screen
1 Click the [Create] button in the [Resource Management] screen.
Or, hold the mouse cursor on the header menu and then click [Create Resource] displayed.
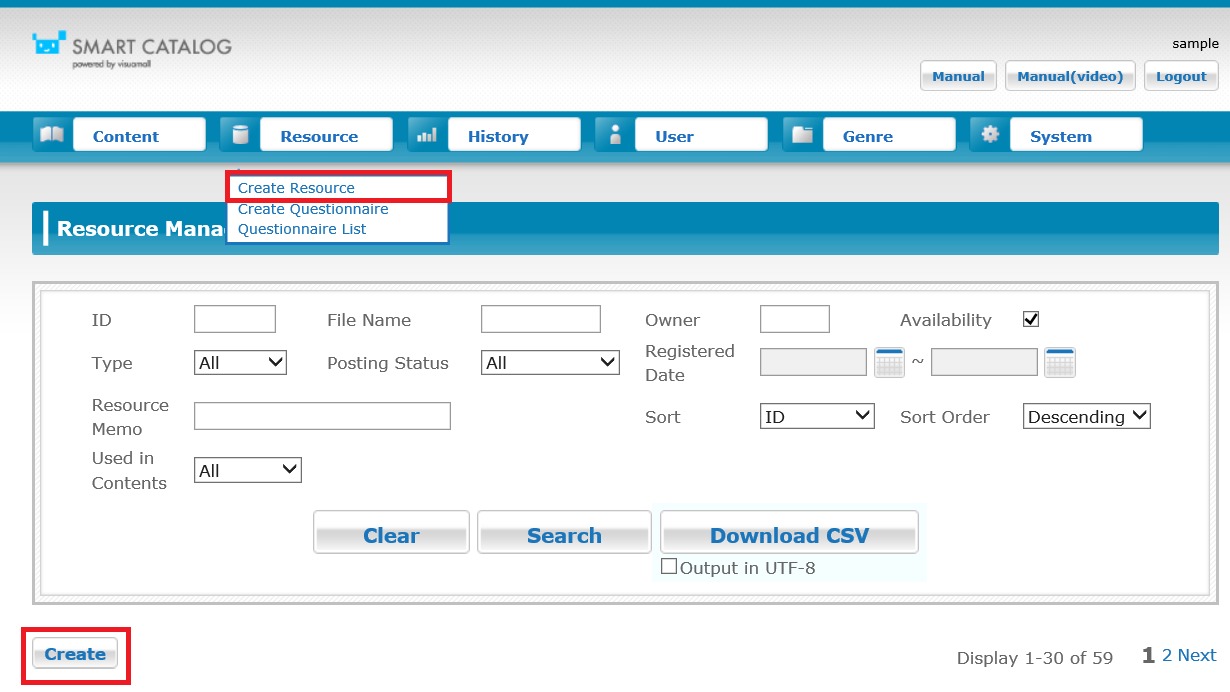
The [Register Resource] screen is displayed.
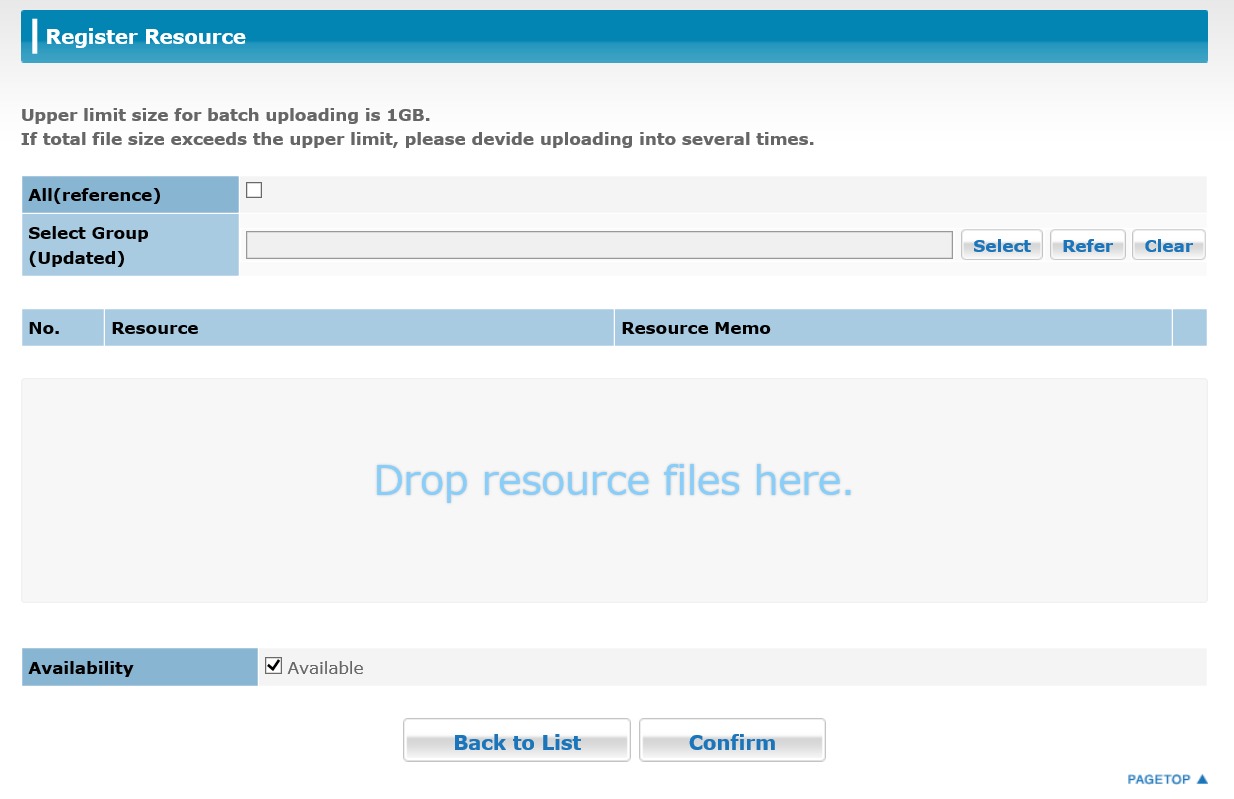
2 Drag and drop the resource files on the PC to the "Drop resource files here." area.
When using a browser that does not support the drag-and-drop operation, upload the documents by selecting file names.
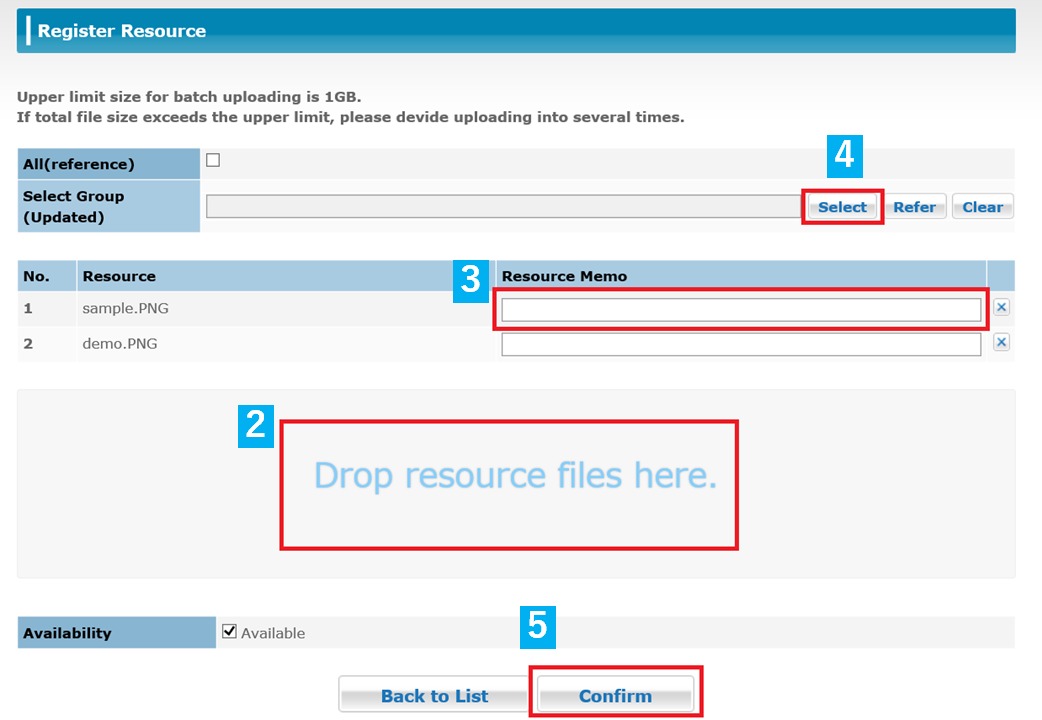
You need to select at least one resource.
To cancel the selected resource, click the  [Delete] button.
3 Enter a memo about the resource to be created in "Resource Memo." You can enter up to 128 characters.
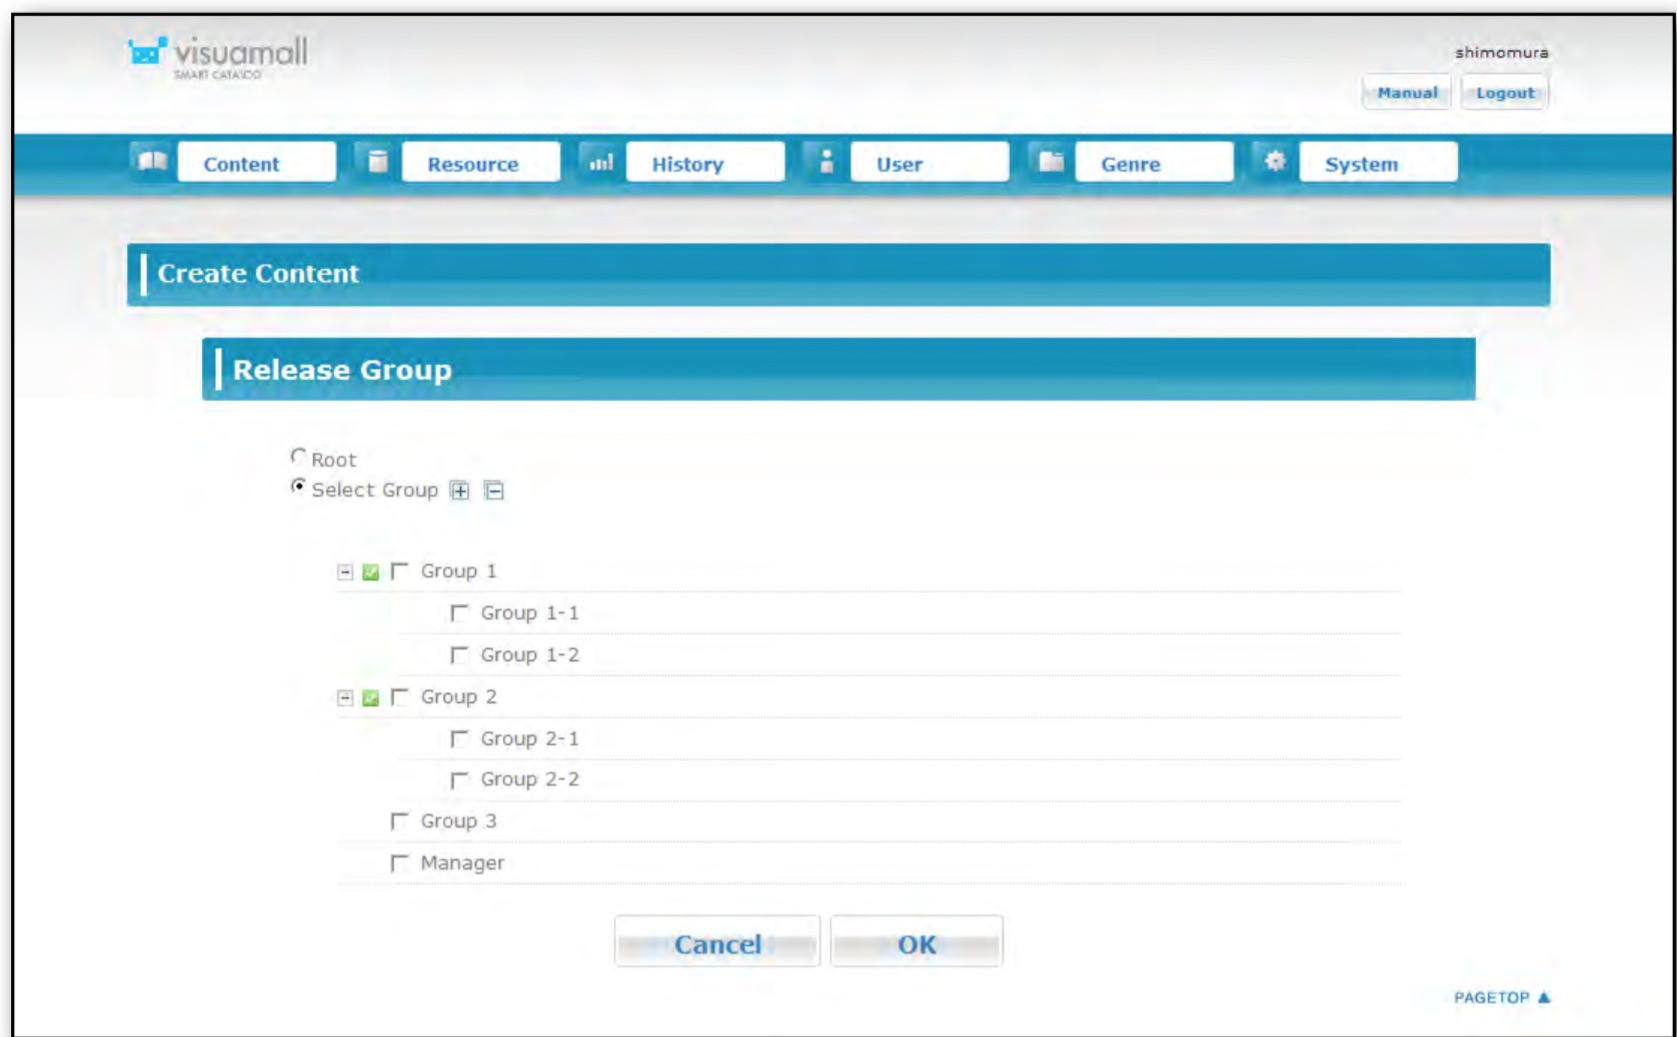
4 Click the [Select] button in "Group (Updated)."
The [Select Groups of Publish to] screen is displayed.
If the resource is used in groups, specify the name of groups to release the resource to by selecting checkboxes.
If the resource is used in all groups, specify "all (reference)" by selecting the checkbox.
Memo
・When a group in an upper hierarchy of groups arranged in a hierarchy is specified, groups in a lower hierarchy do not become the target. You need to specify all groups that are the target of the release.
・Click the  (check mark) button to specify all groups included in the hierarchy.
5 Click the [Confirm] button to create the resource.
Register the selected resources. To cancel, select [Back to List].
Memo
・The maximum file size you can upload at one time is 1 GB per file and 1 GB in total. If the size of the files exceeds these limits, upload the files in multiple times.
・For uploading files from the screen, HTTPS protocol is used.
・If you get an error after uploading PDF or video file, please refer to the "2.4 Resource-Related Troubleshooting."
・If the pixel number of an image is high, the image will get conpressed when it gets registered. Recommended size is 1024 x 768 pixel or under. Please creat an image with recommended size and upload it again as a resource.
When the size of a file exceeds 1 GB, reduce the file size.
5.3 Updating Resources
1 Select the "Modify" button to update the resource on the "Resource Management" screen.
The "Update Resource" screen is displayed.
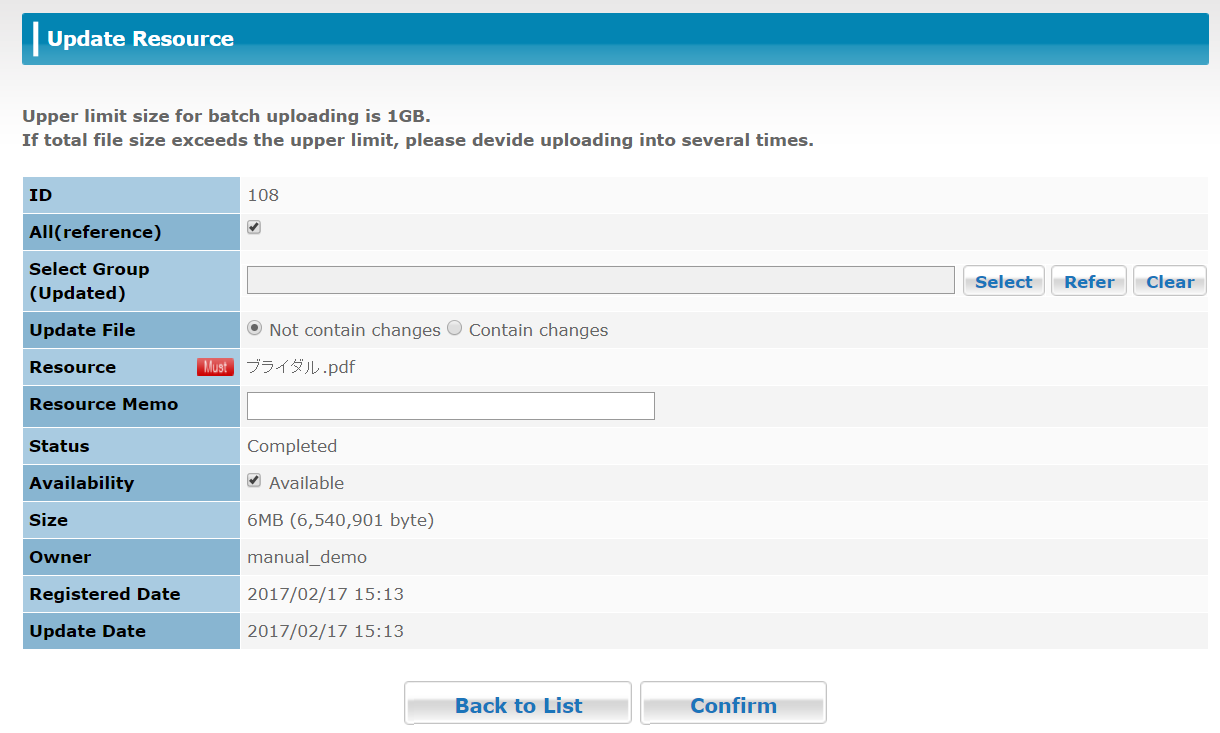
2 Enter the items.
The items which is able to update are "All(reference)", "Select Group(Updated)", "Update File", "Resource", "Resource Memo" and "Availability".
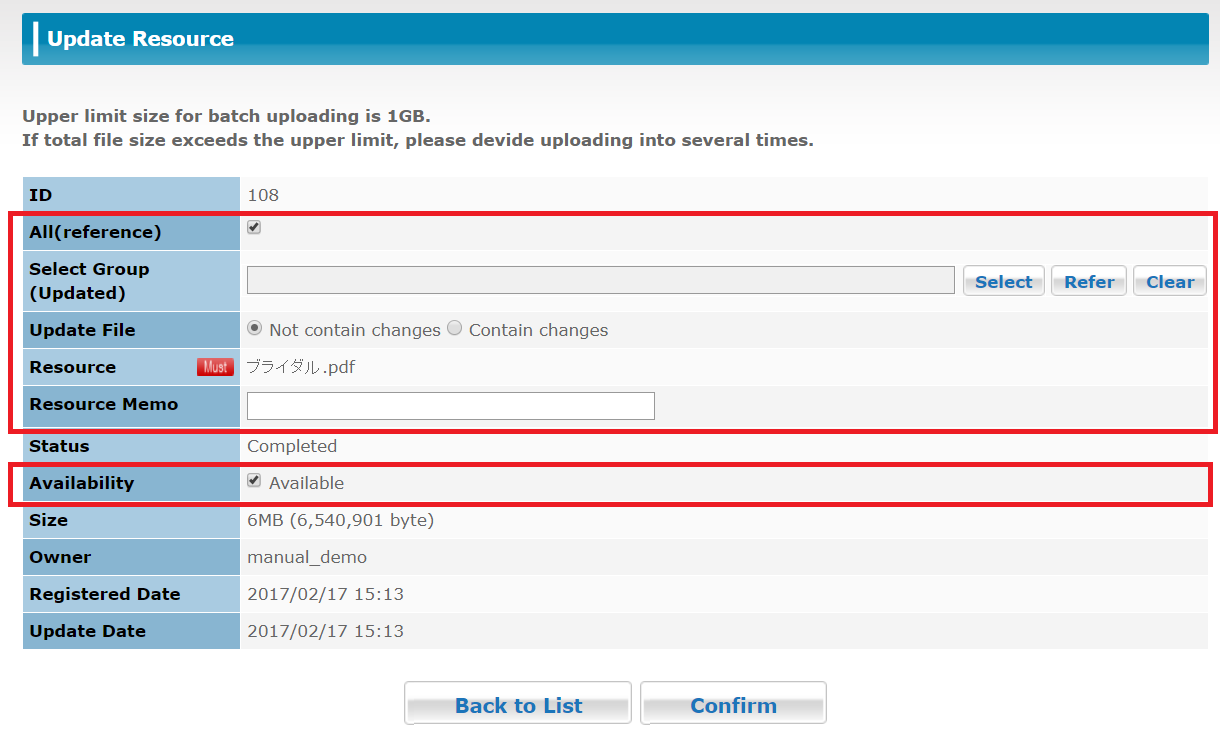
Memo
・When changing a file, it cannot be changed to the file which has the different extension with the original file. The same extension file must be selected.
・When a PDF(OFFICE) file is changed, the base file of the content is also changed, bookmark and memo in the application may be deleted.
・When length and width of a PDF(OFFICE) file is changed, the authoring data may be deleted.
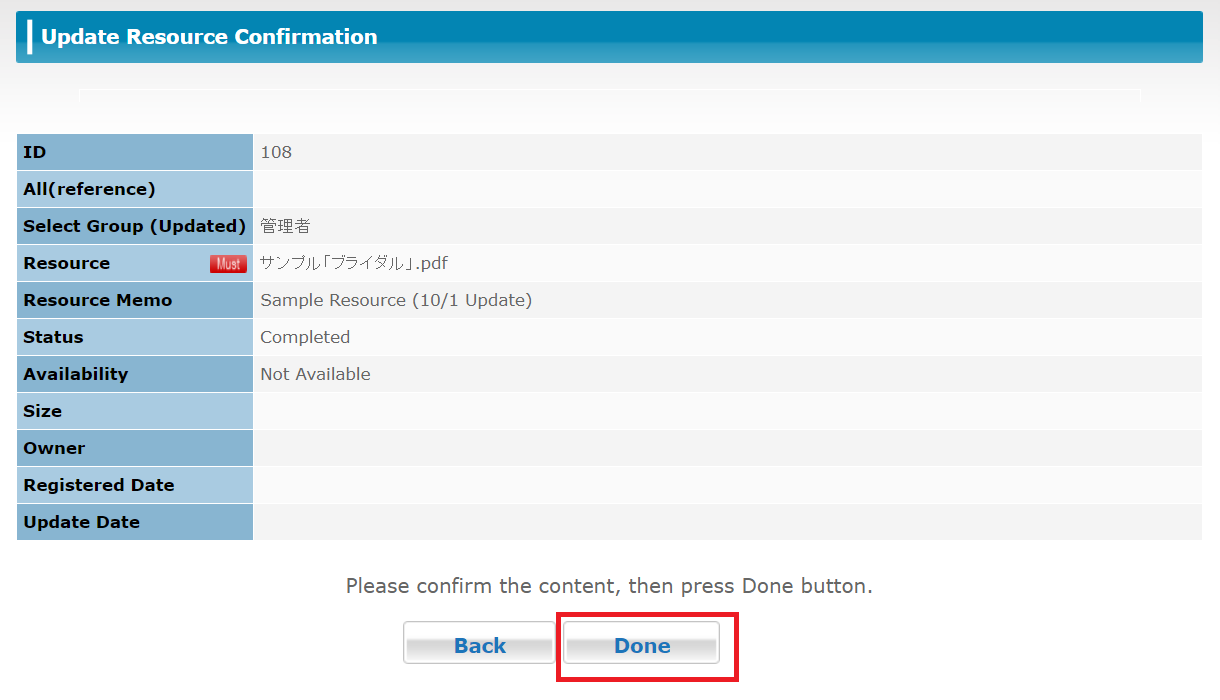
3 The "Update Resource Confirmation" screen is displayed by clicking the "Confirm" button on the "Update Resource" screen. Click the "Donn" button to execute update of the resource.
When modifying the entered data, select the "Back" button.
5.4 Creating a Large Number of Resources at One Time
"SFTP upload function" was removed on March 31, 2023. Please look at "5.2 Creating Resources from the Screen".
5.5 Download resources for "Registered" contents
1 Click on "Resource" button at Header Menu, and open the "Resource Management" page.

2 Perform a search to find the resource to be downloaed.
3 Click on "Resource File Name" which is shown as a hyperlink, then the resource will be downloaded.
Memo
If a "Content File Name" doesn't appear as a hyperlink, you cannot download the resource.
A Content Administrator can download every resource file (except the resources for Sample Contents).
Those who are other than Content Administrators, they can download resources that have been uploaded by themselves.
5.6 Delete Resources
1 Click on "Resource" button at Header menu.
”Resource” page is displayed.
2 At the most right row on the list, check boxes for "Select" is appeared.
Check "ON" for resources you want to delete, then click "Delete" to delete selected resources. You can select multiple resources at once.
Memo
For the resources that are in use for contents, delete buttons don't appear, and it means you cannot delete the resources.
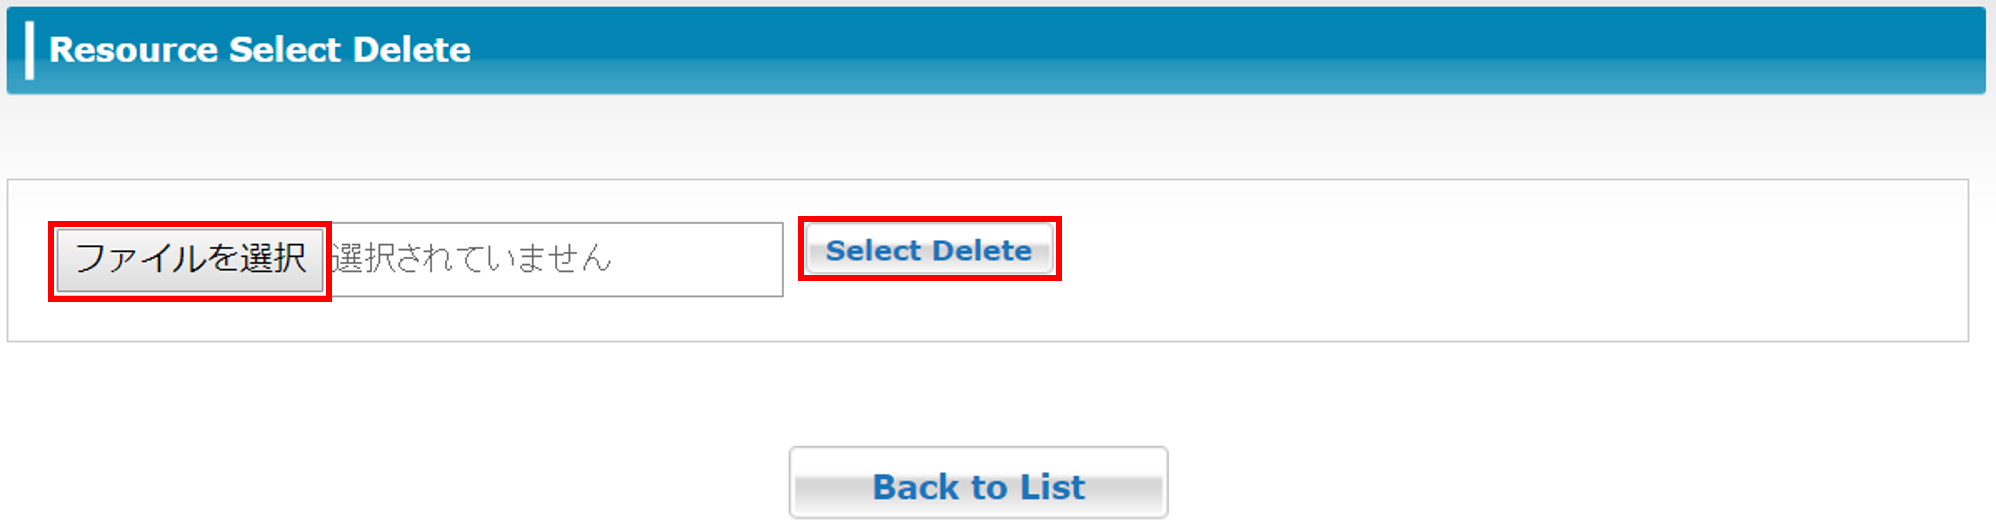
5.7 Resource select deletion
1 Click "Select Delete" on "Resource Management" screen.
"Resource Select Delete" screen is displayed.
2 Enter "Y" for "DelFlg" for the resources to be deleted on the downloaded Resource Management CSV, and save it.
Click "Select File" button, and select the edited csv file above.
Click "Select Delete" button.
Click "Back to List" if you want to back to the "Resource Management" screen.
Attention
An error would be displayed In case the CSV contains wrong data. Please fix the data by following the error message shown.
The upper limit for batch deletion is 1,000
*A format error may happen if you edit the csv file by Microsoft Excel. In case of that, please use text editor.
*In case the resource to delete is assigned for some contents, please release the assignment to delete the resource.
5.8 Registering an Questionnaire
Register an enquete and then register questions and answers for the questionnaire.
● Registering an Questionnaire
1 Mouth over the  icon on the header menu, and then click "Create Questionnaire".
Or, click [Questionnaire list]. In the [Questionnaire Management] screen displayed, click [Create].
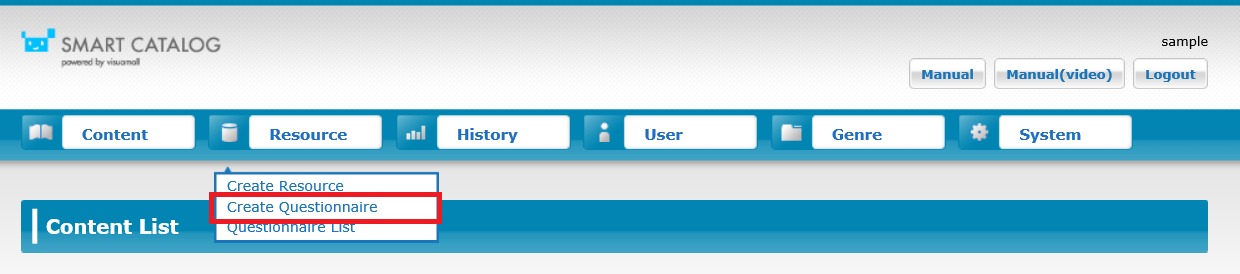
The [Questionnaire Management] screen is displayed.
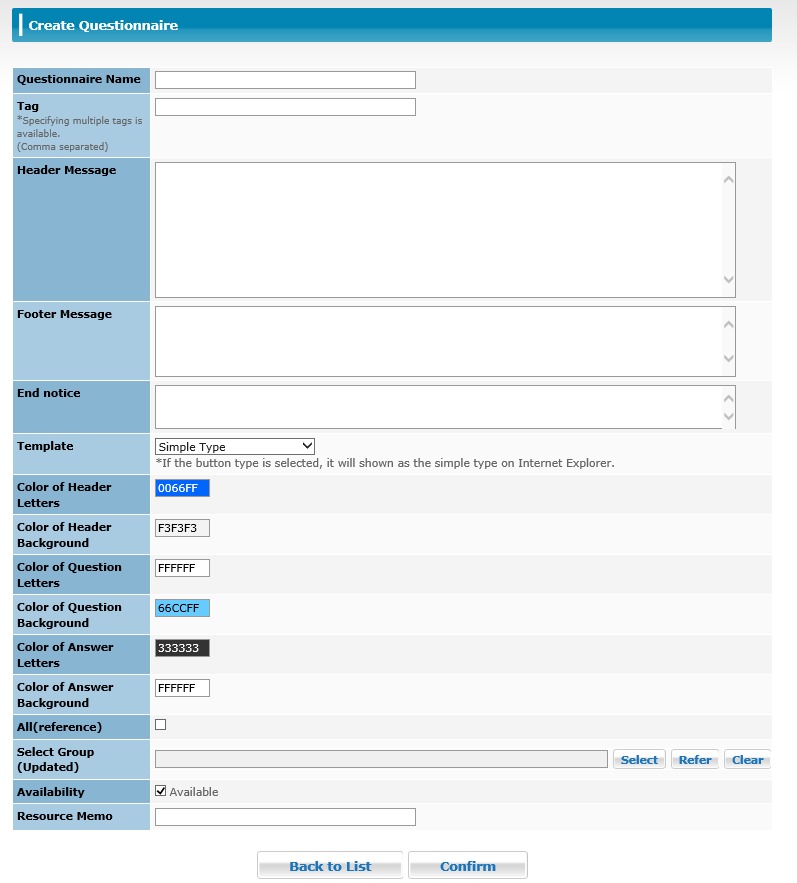
2 Register basic information of the enquete referring to the description below.
| Item | Explanation |
|---|---|
| Questionnaire name |
You can enter up to 100 two-byte characters. |
| Tag | Enter tags to be used for searching the enquete. For tags, you can enter up to 256 characters in total including separators. You can enter up to 30 characters per tag. For separators, one-byte "," and "‚" can be used. Spaces between tags are automatically eliminated during registration. Redundant tags are registered as one tag. |
| Header Message | You can enter up to 500 two-byte characters. |
| Footer Message | You can enter up to 500 two-byte characters. |
| End notice | You can enter up to 100 two-byte characters. |
| Template | Select the format to display the enquete from among the three types below. ・Simple Type ・Table Type ・Button Type |
| Color of Header Letters | Specify the color of characters in the header. |
| Color of Header Background | Specify the background color of the header. |
| Color of Question Letters | Specify the color of characters of questions. |
| Color of Question Background | Specify the background color of questions. |
| Color of Answer Letters | Specify the color of characters of answers. |
| Color of Answer Background | Specify the background color of answers. |
| All(reference) | Specify this item to use the data in all companies. |
| Select Group (Updated) |
Specify this item to use the data in specific groups. |
| Availability | When the checkbox is cleared, the data can no longer be used as a resource. |
| Resource Memo | Register the resource memo. It can also be used for searching questionnaire. |
3 Click the [Confirm] button.
The [Questionnaire Confirmation] screen is displayed, where you can check the settings to be registered.
Click the [Back] button to cancel the registration and go back to the [Create Questionnaire] screen.
4 Check the information entered and click the [Done] button.
The [Questionnaire creation has been completed.] screen is displayed and the registration of the questionnaire is completed.
Click the [Back to List] button to go back to the [Questionnaire Management] screen.
Memo
Click an enquete name in the [Manage enquete] screen to modify basic information of a registered enquete.
●Registering questions and answers
1 Mouth over the  icon on the header menu and then click "Questionnaire List".
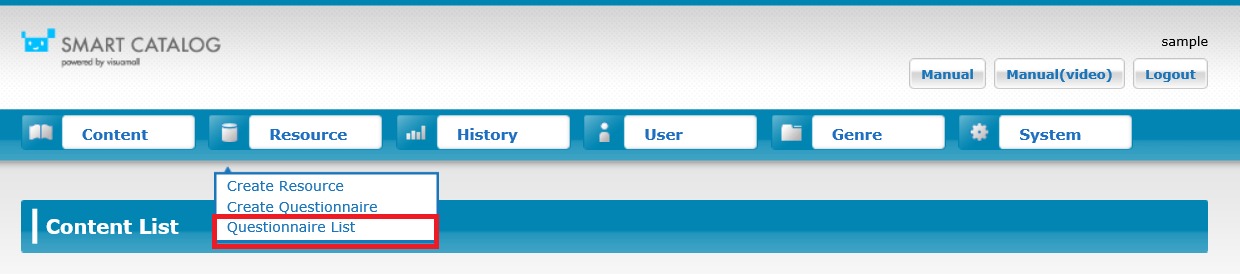
The [Questionnaire Management] screen is displayed.
2 Click the  (Question) button for the enquete you want to register questions for.
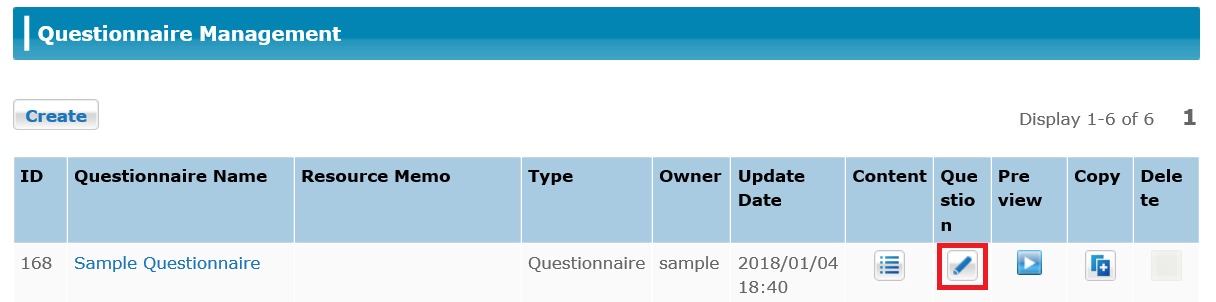
The [Question list] screen is displayed.
3 Click the [Create] button.
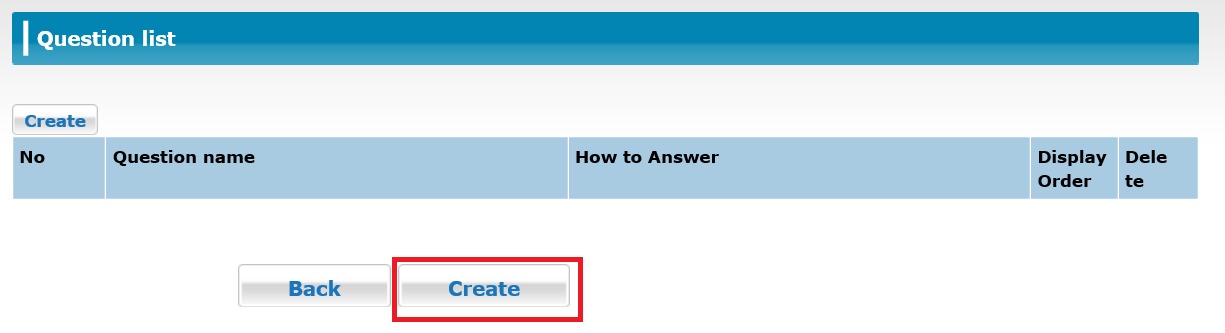
The [Register Question] screen is displayed.
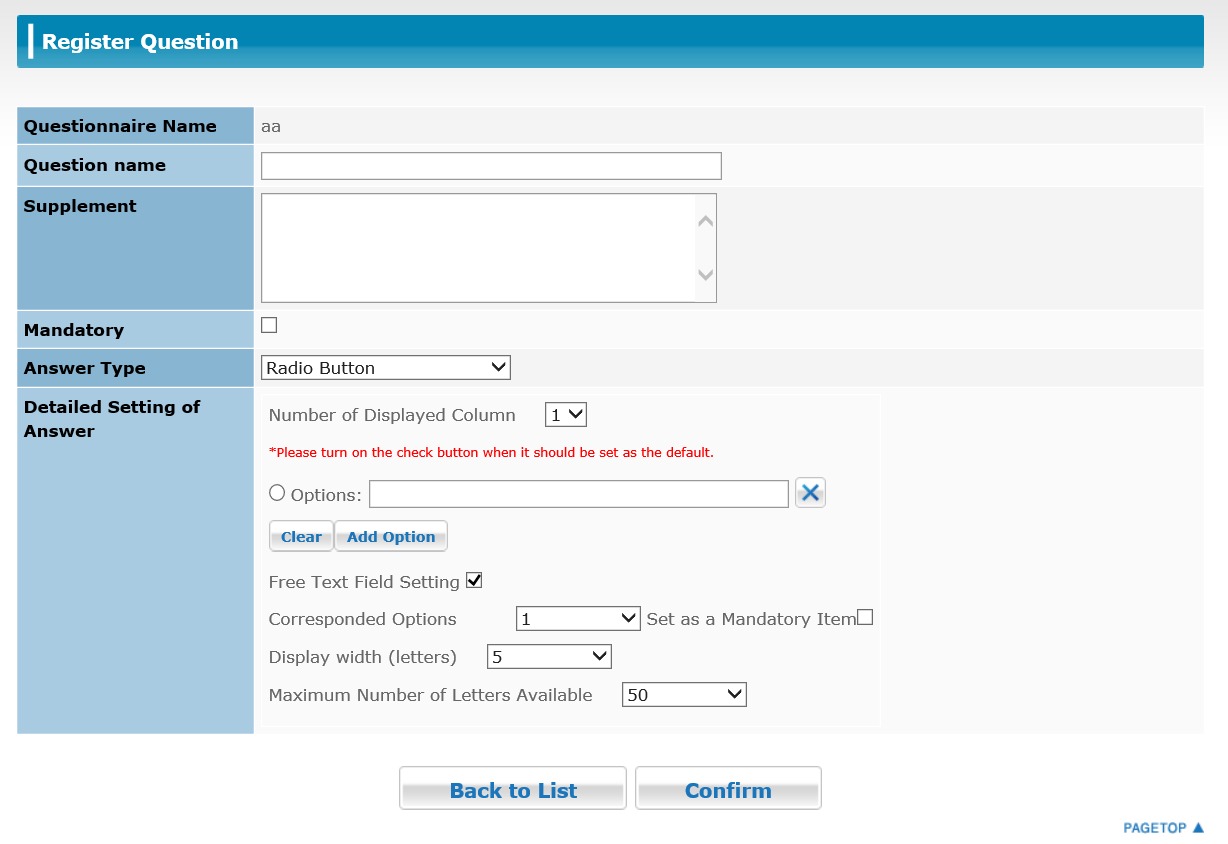
4 Register questions and answers referring to the description below.
| Item | Explanation |
|---|---|
Question name  |
You can enter up to 100 two byte characters. If over 100 characters are entered, the 101st character and after are omitted. |
| Supplement | You can enter a supplement to be displayed for the question in up to 500 two byte characters. |
| Mandatory | When this checkbox is selected, an answer will be required for the question. |
| Conditionally Mandatory Item | When a specific answer is replied for the question selected in this item, an answer will be required. |
| Conditionally Mandatory Answer | Select the answer for "Conditionally Mandatory Item." You can select 14 items at the most. |
| Answer Type | Select the answer type from among the six types below. ・Radio Button ・Check Box ・Select Menu ・Text Area ・Textbox ・Date |
<Detailed Setting of Answer>
| Answer Type | Item | Explanation |
|---|---|---|
| Radio Button | Number of Displayed Column | Select from 1 to 4. |
| Options | Enter the selection of reply in the entry field. Click the [Add Selection] button to add selections of reply. Select one of the selections of reply by a radio button to make the respective selection the default selection. Click the [Clear] button to cancel the selection. The text of [options] can be written 100 characters at the most. | |
| Free Text Field Setting | You can add an entry field besides selections of reply. | |
| Corresponded Options | Set this item when a FreeText field has been set. Specify the order of the FreeText field from 1 to 20. When the [Set as a Mandatory Item] checkbox is selected, the entry in the entry field will be required for users that select the FreeText field. | |
| Display width(letters) | Set this item when a FreeText field has been set. Select from 5 to 50 in increments of 5. |
|
| Maximum Number of Letters Available | Set this item when a FreeText field has been set. Select from 50 to 1000 in increments of 50. |
|
| Check Box | Maximum Number to Select | Select from 1 to 20. |
| Minimum Number to Select | Select from 0 to 20. | |
| Number of Displayed Column | Select from 1 to 4. | |
| Options | Enter the option in the entry field. Click the [Add Option] button to add option. Select the checkbox of one of the option to make the respective selection the default selection. The text of [options] can be written 100 characters at the most. | |
| Free Text Field Setting | You can add an entry field besides selections of reply. | |
| Corresponded Options | Set this item when a FreeText field has been set. Specify the order of the FreeText field from 1 to 20. When the [Set as a Mandatory Item] checkbox is selected, the entry in the entry field will be required for users that select the FreeText field. | |
| Display width(letters) | Set this item when a FreeText field has been set. Select from 5 to 50 in increments of 5. |
|
| Maximum Number of Letters Available | Set this item when a FreeText field has been set. Select from 50 to 1000 in increments of 50. |
|
| Select Menu | Add Blank | Selecting this item adds a blank field for reply. |
| Options | Enter the answers to be displayed in the pull down menu. Enter an answer, insert a new line, and enter the next answer. Texts in each line are displayed as options. | |
| Default | Enter the answer to be selected by default. | |
| Text Area | Column width | Select from 5 to 50 in increments of 5. |
| Number of Row | Select from 5 to 20. | |
| Maximum Number of Letters Available | Select from 50 to 4000 in increments of 50 |
| TextBox | Display width(letters) | Select from 5 to 50 in increments of 5. |
| Minimum Number of Letters Required | When necessary, enter a number equal to or smaller than the number specified for "Minimum Number of Letters Required" | |
| Maximum Number of Letters Available | Enter a number between 1 and 32767. | |
| Number of Letters Limit | Select one from among "Numeric Only/Alphabet and Numeric/Full-width Kana/Full-width only/Zip code/TEL/ E-mail address." | |
| Date | Start Date/ End Date | Set the range of dates that can be entered. |
5 Click the [Confirm] button.
The [Register Confirmation] screen is displayed, where you can check the settings to be registered.
Click the [Back] button to cancel the registration and go back to the [Register Question] screen.
6 Check the information entered and click the [Done] button
The [Registering question has been complete] screen is displayed and the registration of the question is completed.
Click the [Back to List] button to go back to the [Question list] screen.
7 To register two or more questions, repeat steps 3 to 6.
The upper limit for the number of questions is 30. Please create another questionnaire if you want to register more than 30 questions.
8 When questions have been registered, click [Back] in the [question list] screen.
The [Questionnaire Management] screen is displayed.
Memo
・You can modify a registered question. In the  [Questionnaire Management] screen, click the (Question) button for the target enquete and then click the question name. If the created questionnaire is being used in content, the questionnaire cannot be edited. Delete the resources of the questionnaire to be modified from the content. However, a question in questionnaire which a user has anwered in the past even just for once cannot be updated even if the questionnaire resource was deleted from contents. Please duplicate the applicable questionnaire and update the duplicated one from [questionnaire management] screen.
・You can check an enquete as if it is displayed on a browser. In the [Questionnaire Management] screen, click the  (Preview) button for the target questionnaire.
・You can copy an questionnaire. In the [Questionnaire Management] screen, click the  (Copy) button for the target questionnaire.
Hint
・A questionnaire is a "Resource" and cannot be distributed by itself. You need to put the questionnaire on a content by using authoring tool and distribute it as a part of the content.