Index
- 4.1 Displaying the Operation Menu
- 4.2 Using the Operation Menu
- 4.3 Switching Pictures Displayed
- 4.4 Displaying Preview Images
- 4.5 Viewing Videos
- 4.6 Playing Music
- 4.7 Linking to Websites
- 4.8 Displaying Different Content
- 4.9 Displaying a 3D Animation
- 4.10 Displaying HTML Content
- 4.11 Answering a Questionnaire
- 4.12 Copying Texts
- 4.13 Highlighting Texts
4.1 Displaying the Operation Menu
Touch anywhere on the viewer screen to display the operation menu.
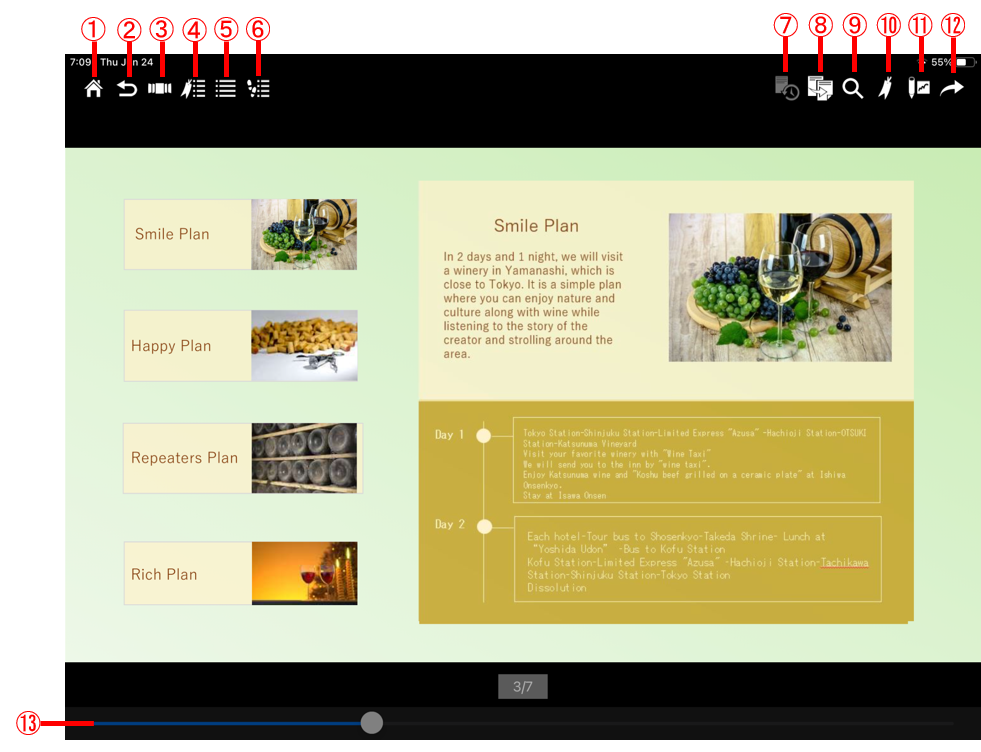
| ① |
 |
Home | Return to the My Library list. |
| ② |
 |
Back | Return to the previous screen that was displayed before the content is displayed. |
| ③ |
 |
Cover Flow | Pages are displayed in cover flow. |
| ④ |
 |
Bookmark List | A list of registered bookmarks is displayed. |
| ⑤ |
 |
Index | The index of contents is displayed. * The index will be displayed if and only if you use Adobe Acrobat and the index is embedded in the PDF file. |
| ⑥ |
 |
Viewing History | Up to 50 pages of viewing history is displayed. |
| ⑦ |
 |
Version History | When PDFs are replaced, data can be displayed for comparison. |
| ⑧ |
 |
Copy Text | Text on the page displayed is also displayed in a pop- up window, and can be copied. |
| ⑨ |
 |
Search | Enter words to search contents. |
| ⑩ |
 |
Add Bookmark | A displayed page can be bookmarked, and the bookmark labeled if bookmark labeling is available. |
| ⑪ |
 |
Highlighting | You can add highlighting on the displayed page. |
| ⑫ |
 |
Output | You can print out contents, send by e-mail, create/play user playlist, and register contents to favorite. |
| ⑬ |
-
|
Scrollbar | Drag the bar left or right to move the page. |
4.2 Using the Operation Menu
▼Sliding a page
On the viewer screen where the content is displayed, move your finger from left to right or from right to left to slide the page.
▼Using the scrollbar
1 Touch anywhere on the viewer screen where the content is displayed.
2 Drag the scrollbar to the left or right.
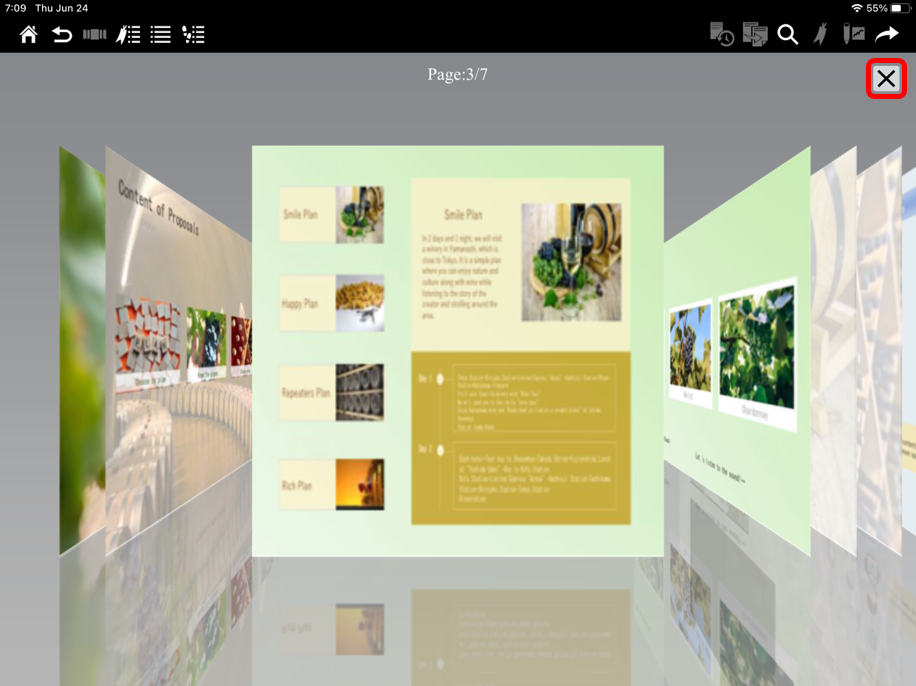
▼Using cover flow
1 Touch anywhere on the viewer screen where the content is displayed.
The operation menu is displayed.
2 Select the  (Cover Flow) button.
Pages are displayed in cover flow.

3 Move your finger from left to right or from right to left to slide pages.
Select the page displayed on the center of cover flow to go to the corresponding page.
Select the  button on the top right of the screen to quit cover flow.
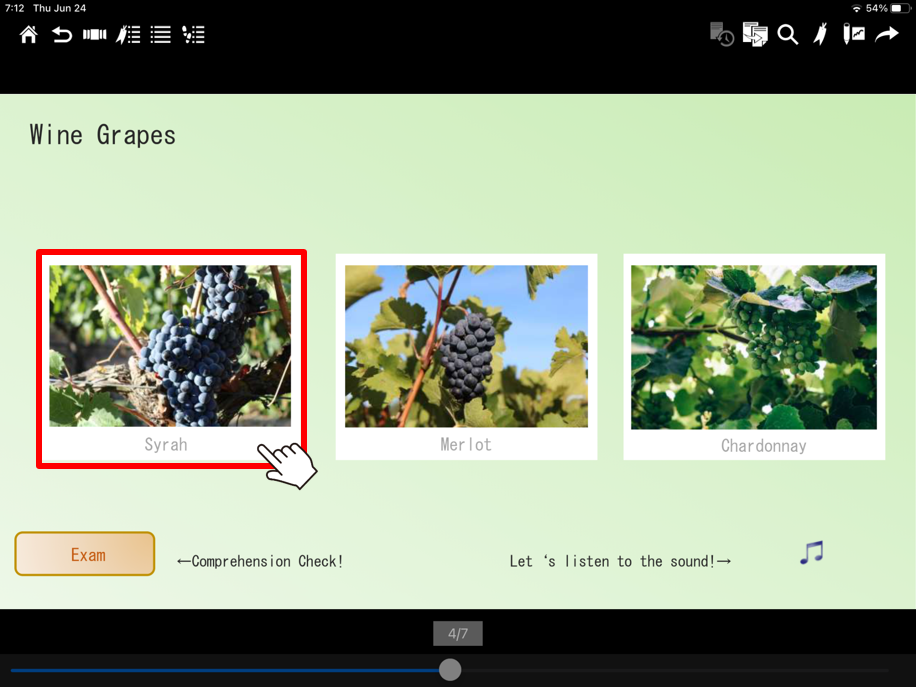
4.3 Switching Pictures Displayed
On contents that switching image is set, you can switch images to be displayed.
1 On the viewer screen of the content, select an image.
The selected image is displayed.
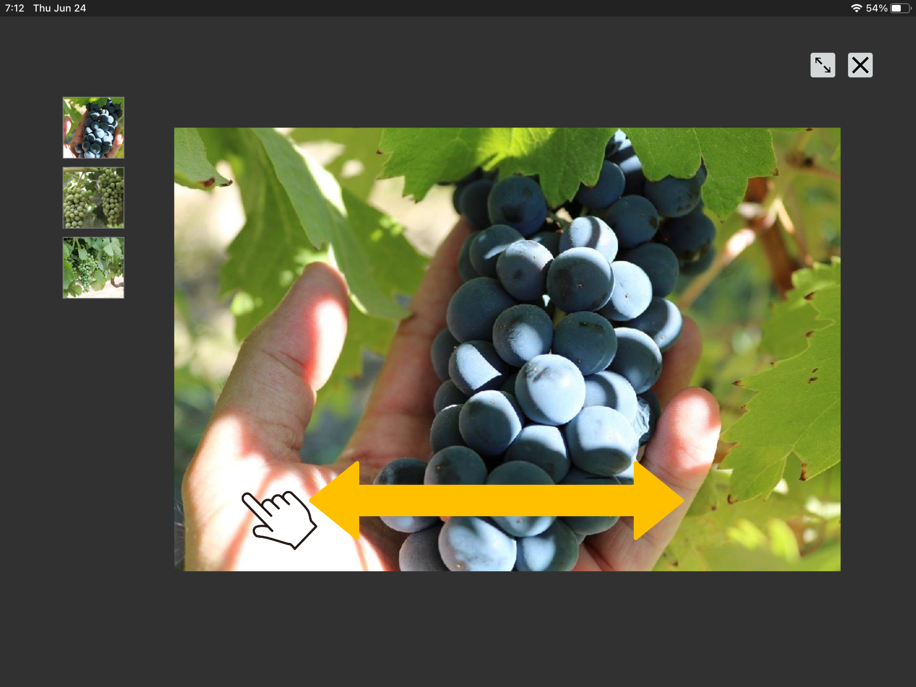
4.4 Displaying Preview Images
On contents that preview images are set, you can display multiple images in a slide show.
1 On the viewer screen of the content, select an image.
Preview images are displayed.
2 Move your finger from left to right or from right to left to switch preview images.
You can also switch preview images by selecting a thumbnail image.
Select the  button on the top right of the screen to quit preview display.
In the case of iPad version, it is displayed in full screen when you select a  button.
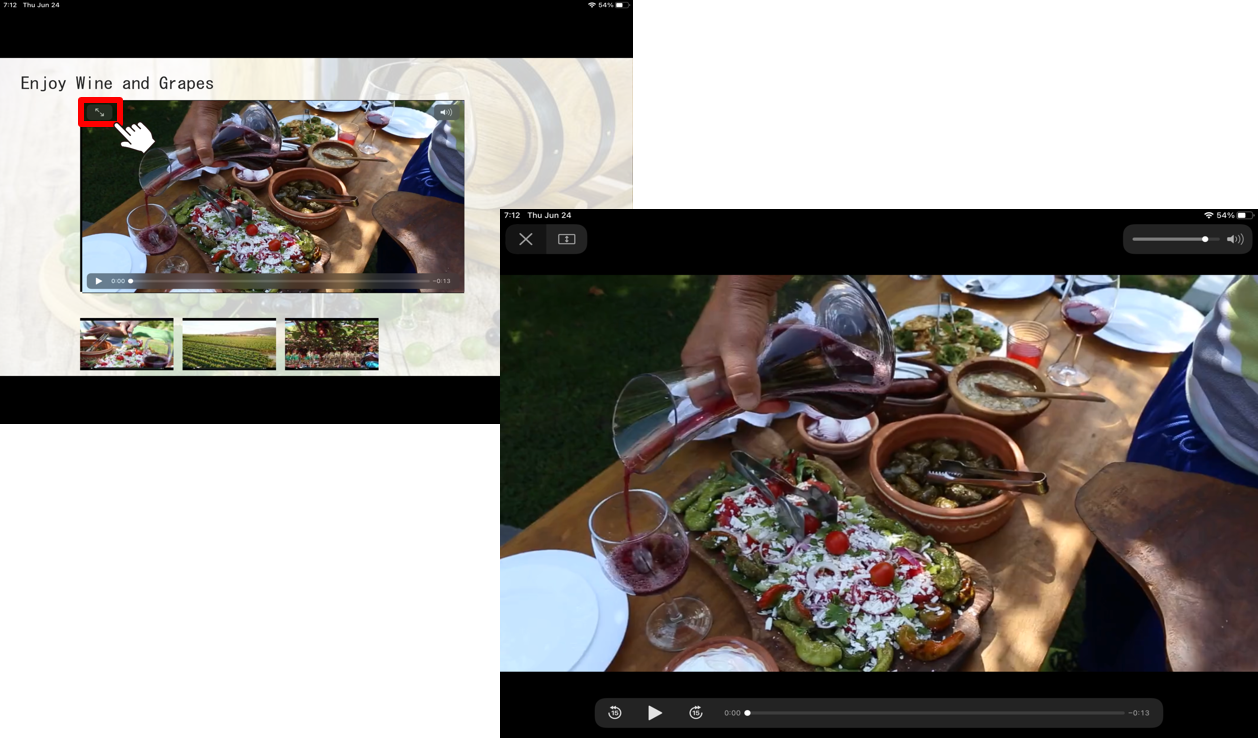
4.5 Viewing Videos
If the content you are viewing has videos on it, then you can play the videos by the following operation.
1.On a content page which the "Switching Video" is set, select one of the pictures on the page. The following image shows 3 small pictures, and they work as the buttons to play the video which is assigned for each button. Tap on one of them to start playing a video on the playing area at the center of the page.
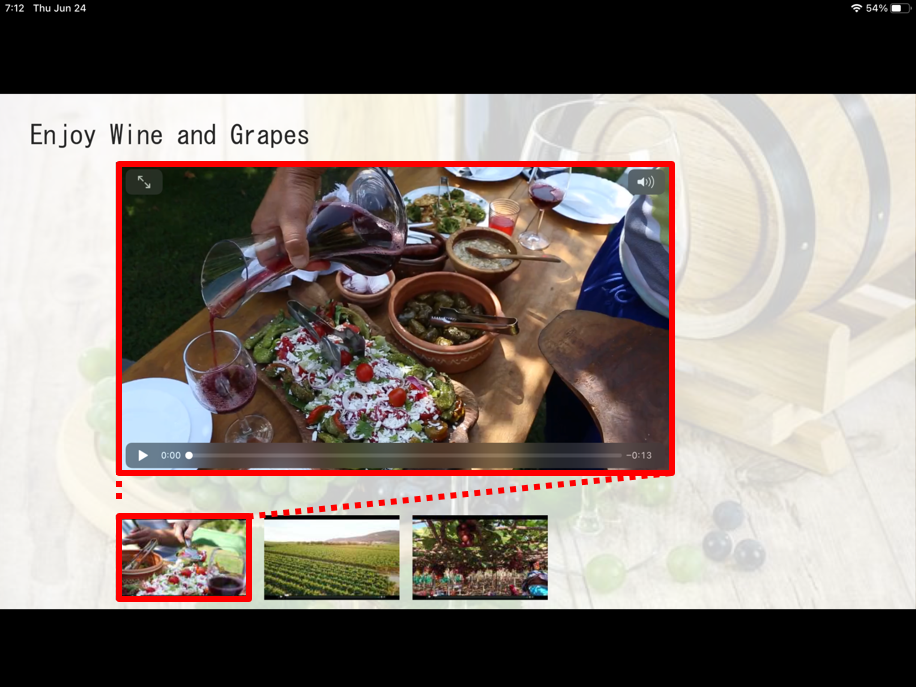
If you chose the button next to the previous one, it also starts playing another video at the playing area at the center of the page.
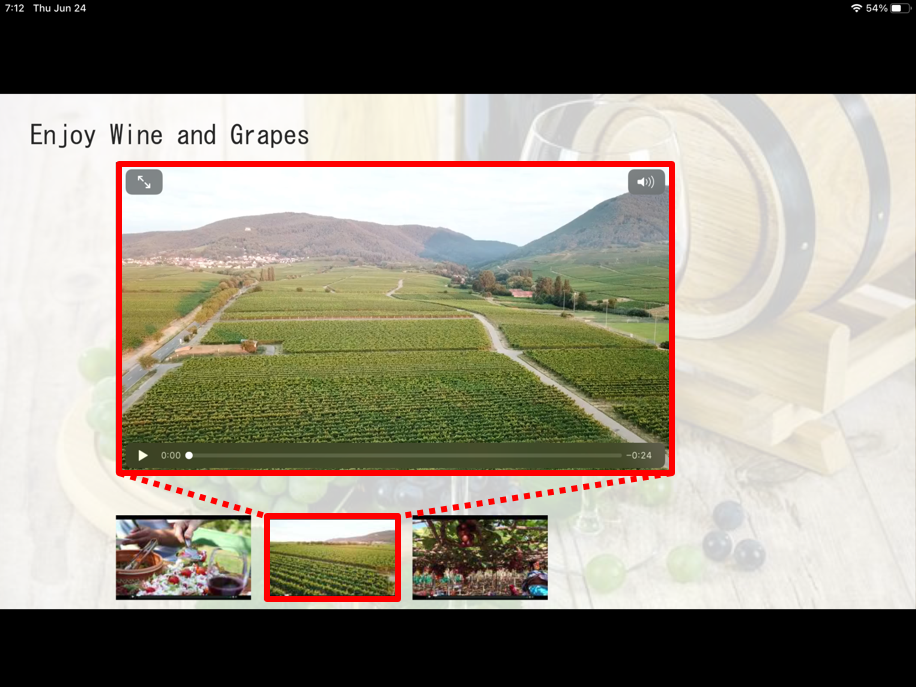
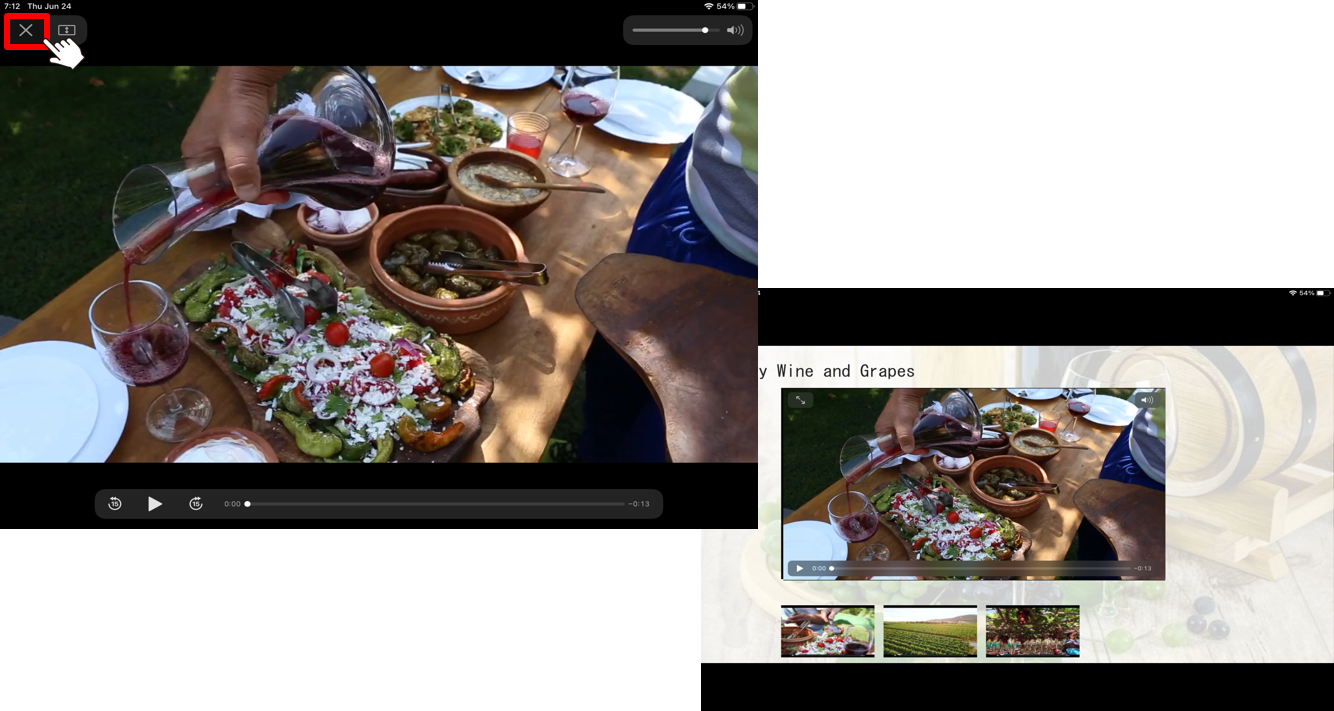
2. Tap on the "Full Screen" button placed on the video playing area to play the video on the Full Screen mode.
3.Tap on the "Exit Full Screen" button placed on the video playing area to return to the content page.
Hint
・Videos are played in different styles depending on how they are registered to the content. Some videos are played on the full screen when a button is selected and others are played in an area of the screen when an image is selected. Also, you can download and watch videos or watch them by streaming. An Internet connection is required to play videos in content set for streaming.
・A video being played in an area of the screen can be played on the full screen using the  button that is displayed when you touch anywhere on the image of the video. To change the size to the original size, use
  displayed when you touch anywhere on the image of the video again.
・If sounds are not played when a video has been played, the device might be set as mute. Please check if the device is set as mute on its control center.
Memo
You can change the settings for playing videos. Select the  (Settings) button from the operation menu of My Library. Select the [Viewer Settings] button and then change the "VIDEO SETTING" item.
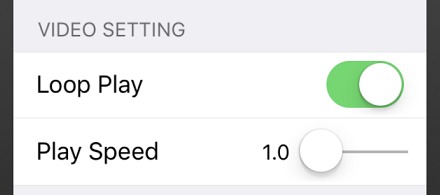
By default, videos are played repeatedly. To quit playing a video after playing it once, set "Loop Play" to "OFF".
・Play Speed
Videos are played at the rate of 1.0x. You can set the rate to play videos in a range from 1.0x (normal) to 2.0x in "Play Speed" (in 0.1x steps). This setting is applied to playing all videos.
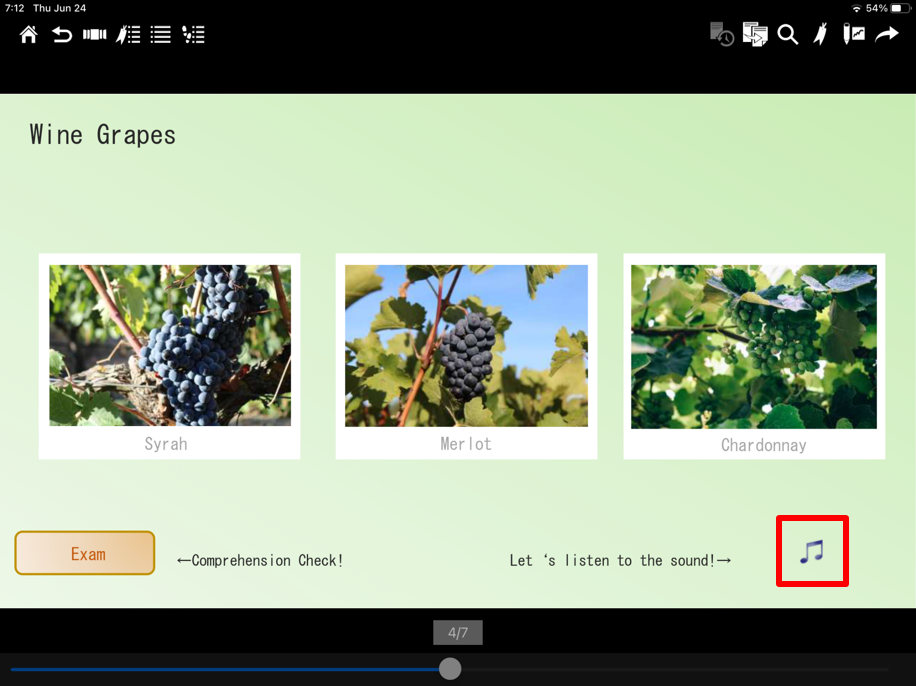
4.6 Playing Music
When music is registered to the content, you can play the music.
1 On the viewer screen of the content, select the  (Play Audio) button.
The music is played.
Hint
If sounds are not played when a video has been played, the device might be set as mute. Please check if the device is set as mute on its control pannel.
Memo
Music registered to a specific page stops if you move to a different page while it is playing. Music registered to the entire content keeps playing even if you move to a different page.
4.7 Linking to Websites
When a website link button is registered to the content, you can display the corresponding website using a web browser on your device.
1 On the viewer screen of the content, select the button to link to the website.
The website is displayed.
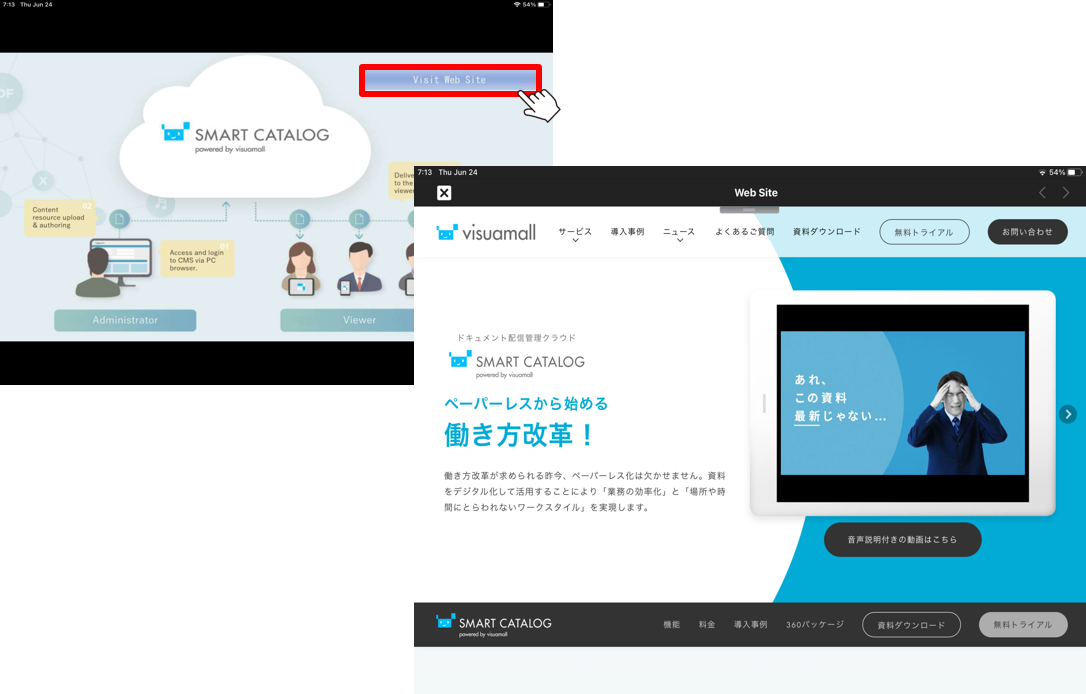
Memo
・Websites are displayed on the iPad/iPhone standard web browser (e.g. Safari) or dedicated browser for SMART CATALOG depending on how the content are available.
・If a URL link has been embedded in a PDF, it is displyed on the dedicated browser.
2 To go back to the content from the website, select the  (Close) button.
Hint
Difference between the  (Back/Forward) button on websites and
  (Close) button of SMART CATALOG

When website is specified as a link destination from SMART CATALOG, you can view websites on SMART CATALOG.
You can move to a website using the  (Back/Forward) button on the operation menu as well.
 Move to the website you viewed previously.
 Move to the website you last viewed.
To go back to the content of SMART CATALOG from a website, press the  (Close) button on the operation menu.
4.8 Displaying Different Content
When a button to link multiple contents is registered to the content, you can display the page of different content.
1 On the viewer screen of the content, select the button to link between contents.
The destination content is displayed.
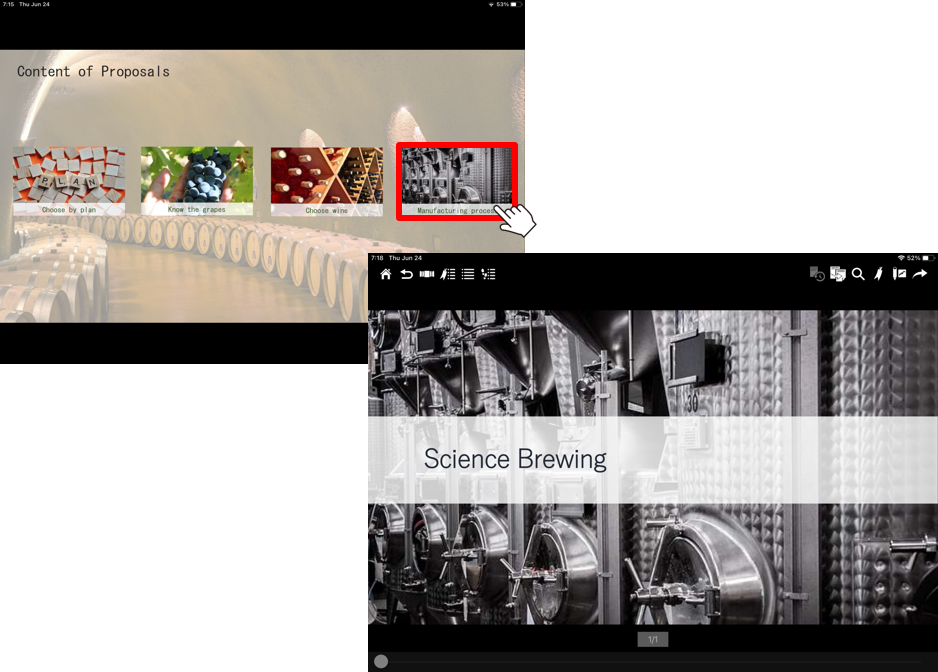
To go back to the original content, press the  (Back) button on the destination content.
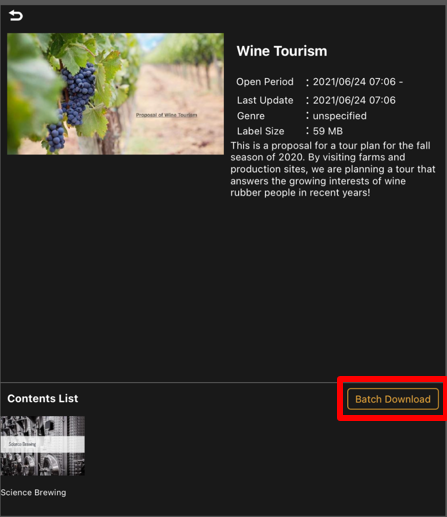
▼If the destination content has not been downloaded
If the destination content has not been downloaded, the details screen of the destination content is displayed and you can directly download the content.
1 On the viewer screen of the content, select the button to link between contents.
A confirmation for download is displayed.
2 Select [OK].
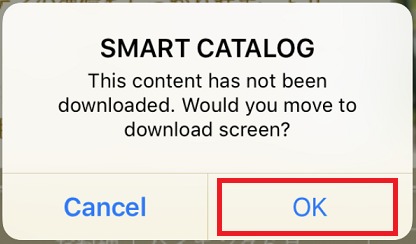
The [Content Detail] screen is displayed.
3 Select the content you want to download and then select the [Downloading start] button. You can also select the [Batch Download] button to download related contents that have not been downloaded at one time.
4.9 Displaying a 3D Animation
When 3D animation is registered to the content, you can use and display 3D animation. Slide the image up, down, or sideways on the screen to display it as 3D animation.
1 On the viewer screen of the content, touch the 3D animation image.
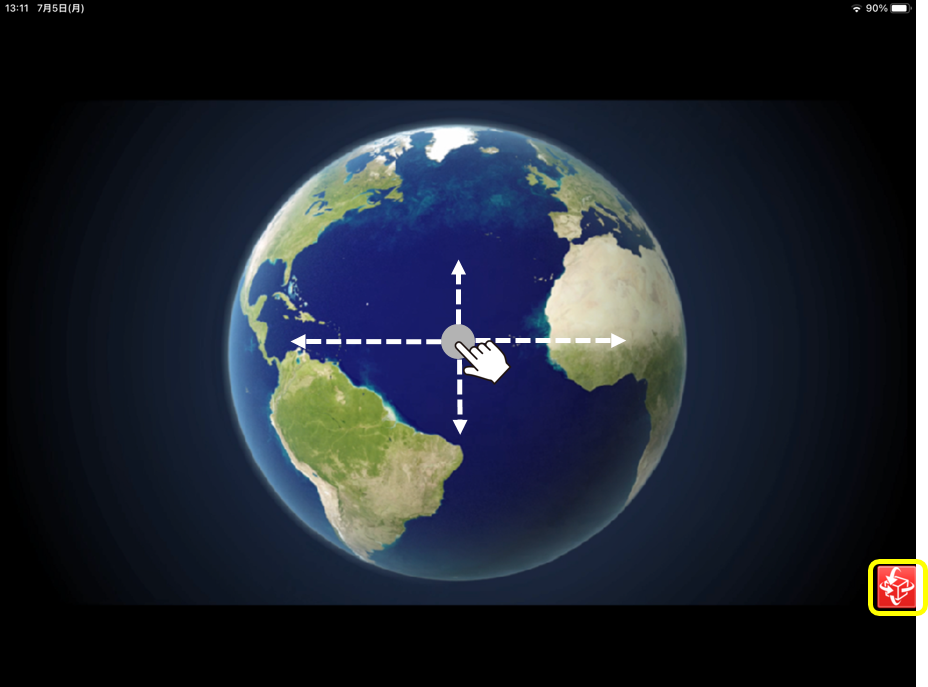
With the iPad, the red  mark disappears if you keep your fingers on the screen, and operations are enabled.
With the iPhone, the operations screen appears.
2 Slide the 3D animation image up, down, or sideways.

The animation image is displayed in 360 degrees from all directions, vertically, horizontally, and depth-wise.
4.10 Displaying HTML Content
If HTML content is registered to content, the HTML content can be displayed using the browser function of the device.
1 On the viewer screen of the content, select the button to link to the HTML content.

The HTML content is displayed on the dedicated browser for SMART CATALOG.
2 To quit displaying the HTML content, select the  (Close) button.
Hint
Operation menu

You can move to HTML content using the  (Back/Forward) button on the operation menu as well.
[<]: Move to the HTML content you viewed previously.
[>]: Move to the HTML content you last viewed.
By selecting the slide down from the operation menu, you can switch between displaying/hiding the operation menu.
To go back to the content of SMART CATALOG from HTML content, select the  (Close) button on the operation menu.
4.11 Answering a Questionnaire
If a questionnaire is registered in content, you can answer the questionnaire and send the answer.
1 On the viewer screen of the content, select the button to link to the questionnaire.
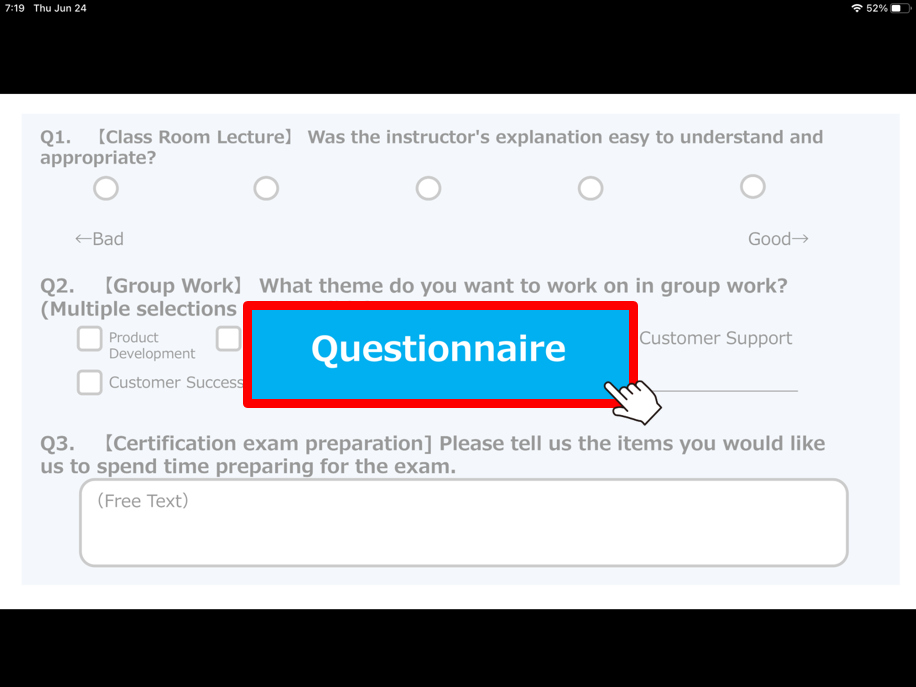
The questionnaire is displayed on the right side of the screen or the full screen.
2 Select or enter the answer to the questionnaire.
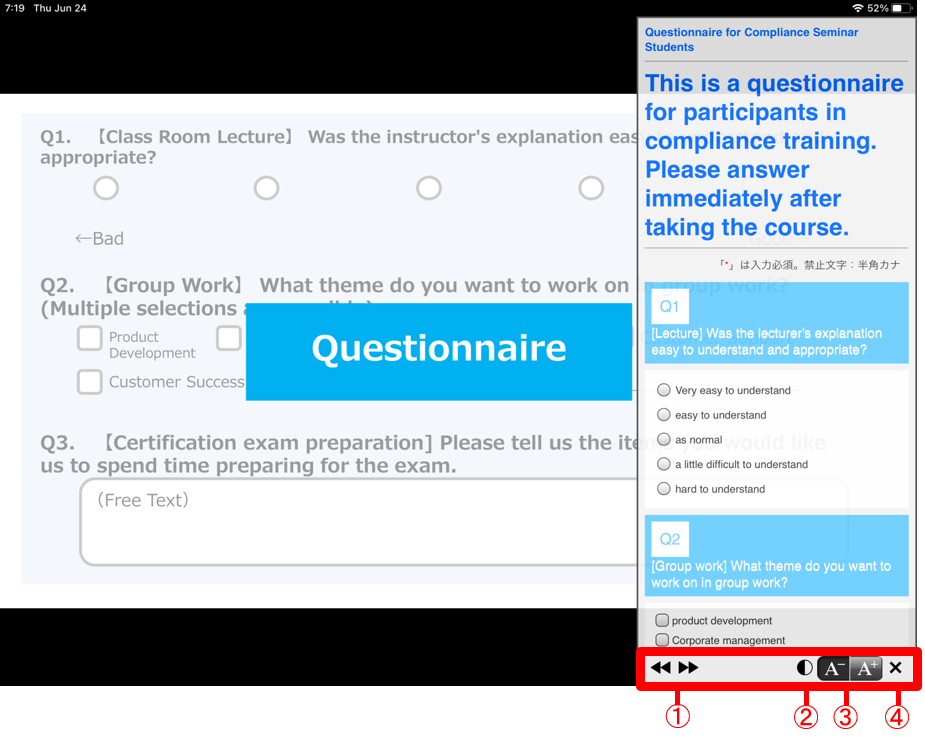
Display settings can be changed using the buttons displayed below the questionnaire. :Moves the area to display the questionnaire to the left or right side of the screen.
(When the questionnaire is displayed on the entire screen, this button is not displayed) :Use this button to set the transparency to display the questionnaire.
 :The size of texts of the questionnaire can be selected from large and small.
 :Closes the questionnaire displayed.
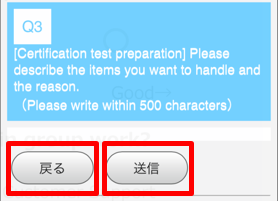
3 After answering the questionnaire, select the [Confirm] button at the bottom of the questionnaire displayed.
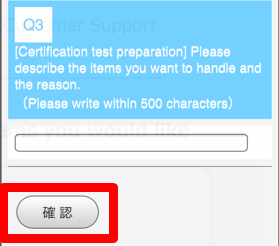
A confirmation is displayed.
4 Confirm the information entered and select the [Send] button.
To change the answer, select the [Back] button.
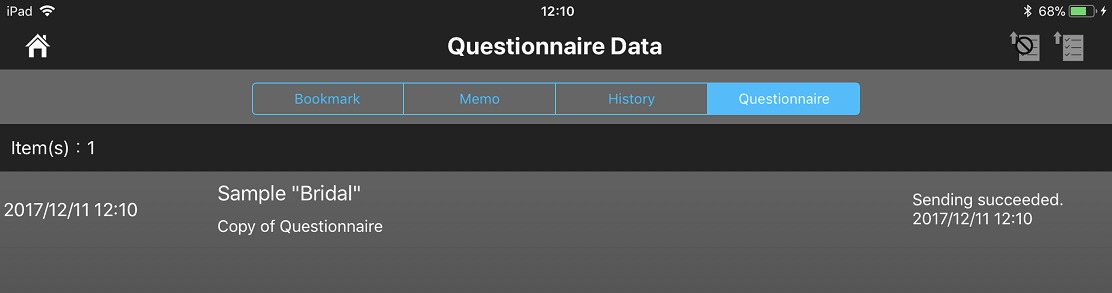
The answer for the questionnaire is sent to the content management system. If the answer is sent when you are off-line, the answer will be sent when the connection status becomes online.
5 Select the  button to quit displaying the questionnaire.
Memo
・Questionnaires are displayed in different styles and colors.
・For questionnaires with an "answer once only" limitation, selecting the link button to the questionnaire will display "This questionnaire has already been answered."
・Questionnaire sending status can be checked from the "questionnaire results" of the "My data". About questionnaire that failed to send, can be sent again from this screen.
・Even though the device is offline, it is possible to answer a questionnaire. The answer entered when offline will be stored in the application, and that answer data will be automatically sent when gotten back on online.
・If several answers have been input by the same device to a questionnaire, the previous answer entered will not be updated, and the new answer will be sent to the server side as another new answer.
4.12 Copying Texts
You can copy texts on pages of content. You can paste the copied texts on content of other applications such as memo and web browser.
1 From the operation menu, select the  (Copy text) button.
Text on the page is displayed in a window.
2 Select the text you want to copy.
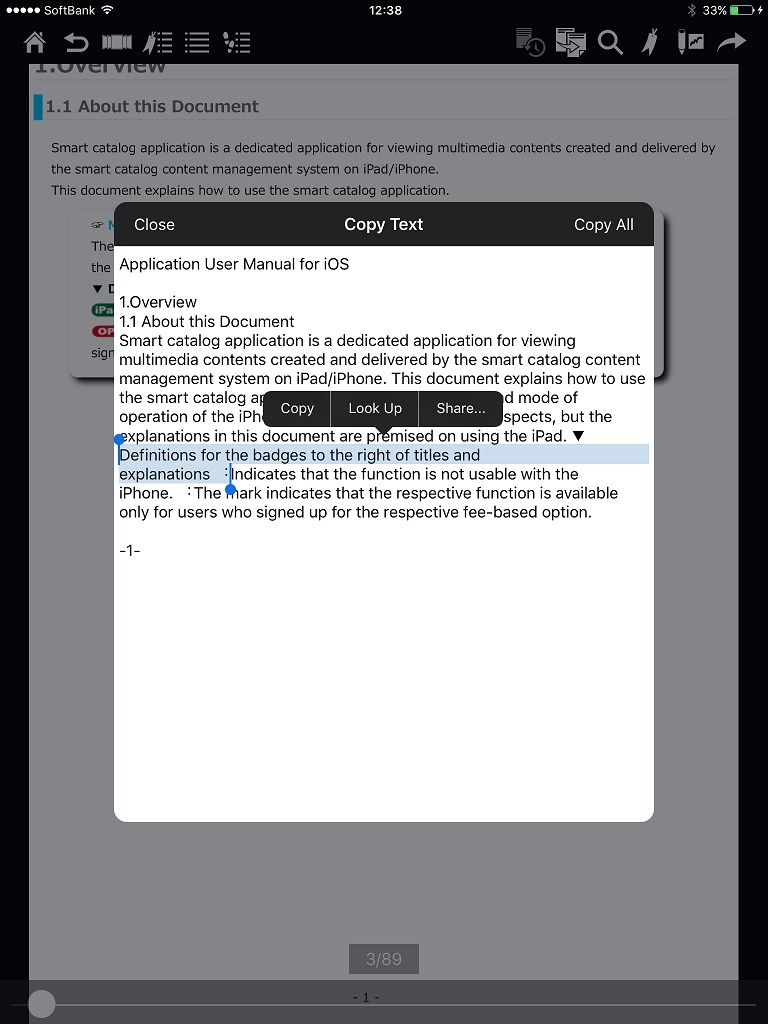
3 Paste the text on the copy destination.
Hint
To copy all texts in the content, select the [Copy All] button.
4.13 Highlighting Texts
You can mark texts on a page of content using the handwriting pen. Highlighting information is saved for each stroke. To delete the highlighting, delete it by each stroke.
▼Highlighting
1 From the operation menu, select the  (Highlighting) button.
The highlighting mode is displayed.
2 From the Highlighting menu, select the  (Pen) button.
3 Mark an area by tracing the area with your finger.
4 From the Highlighting menu, select the  (Fin Edit) button to quit highlighting.
Memo
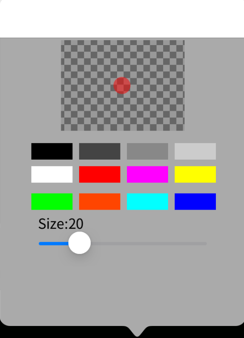
You can change the color and size (thickness) of highlighting. From the Highlighting menu, select the  (Pen Setting) button. You can select a color from 12 different colors and a size within a range between 0 and 100.
▼Deleting highlighting
1 From the operation menu, select the  (Highlighting) button.
The highlighting mode is displayed.
2 From the Highlighting menu, select the  (Delete) button.
3 Delete highlighting by tracing the highlighted area with your finger.
4 From the Highlighting menu, select the  (Fin Edit) button to quit highlighting.
▼Displaying or hiding highlighting information
1 Select  (Display Highlighting) button on the bottom right of the page with highlighting.
Highlighting information is displayed.
2 To hide highlighting information, touch anywhere on the screen.
Highlighting information will be hidden.