Index
5.1 Sorting of Contents
You can sort the contents showed on [New Contents] or [My Library] by some designated orders.
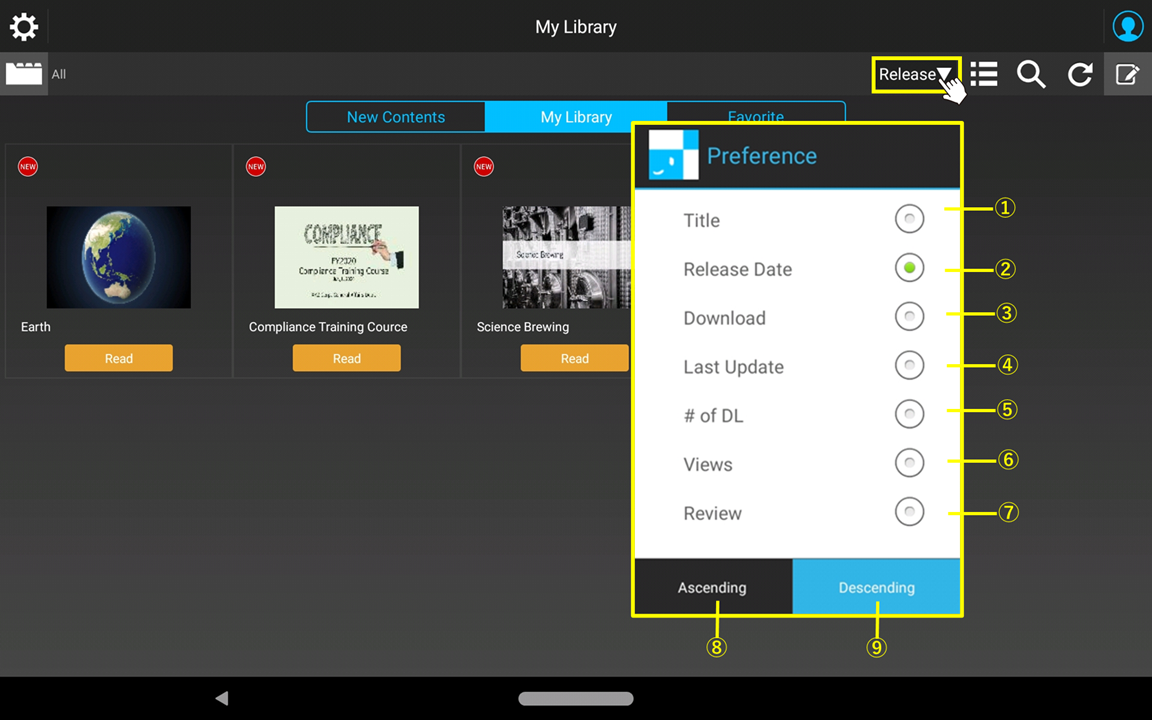
| ① | Title | To sort contents by the title, select this. |
| ② | Release Date | To sort contents by the published date, select this. |
| ③ | Download | To sort contents by the downloaded date, select this. "Download" is available as the condition only on [My Library], not available on [New Contents] screen. |
| ④ | Last Update | To sort contents by the date of the latest update date, select this. |
| ⑤ | # of DL | To sort contents by total number of downloading, select this. |
| ⑥ | Views | To sort contents by the number of viewing, select this. |
| ⑦ | Review | To sort contents by the number of reviewing, select this. |
| ⑧ | Ascending | To apply the ascending order, select this. |
| ⑨ | Descending | To apply the descending order, select this. |
2. Select the condition for the sorting, then the order changes accordingly.
3. You can apply 2 different sorting conditions between [New Contents] and [My Library]. The sorting order will sustain even you shut down and reboot the app.
5.2 Organize contents in Favorite
You can organize contents by folders if you use "Favorite". "Favorite" provides folders to store downloaded contents in it.
1.Add to "Favorite" from [My Library]
From the operation menu, tap "Edit" button. 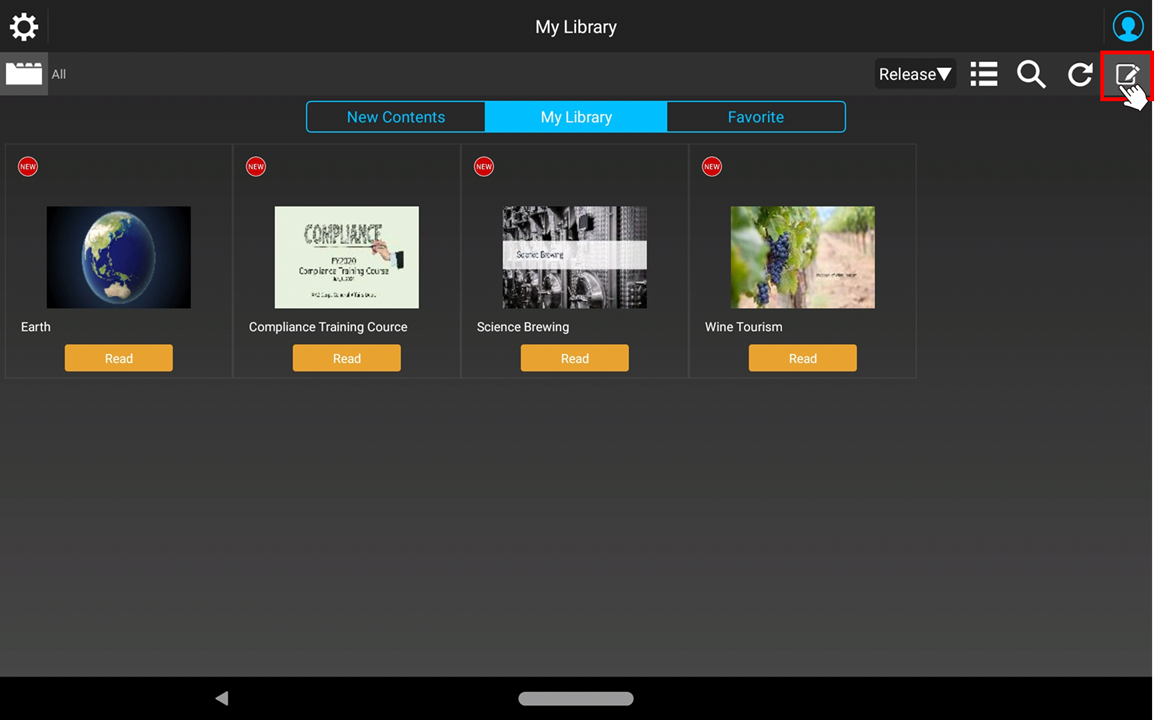
Then the screen turns as below, and select contents you want to organize in "Favorite" folder.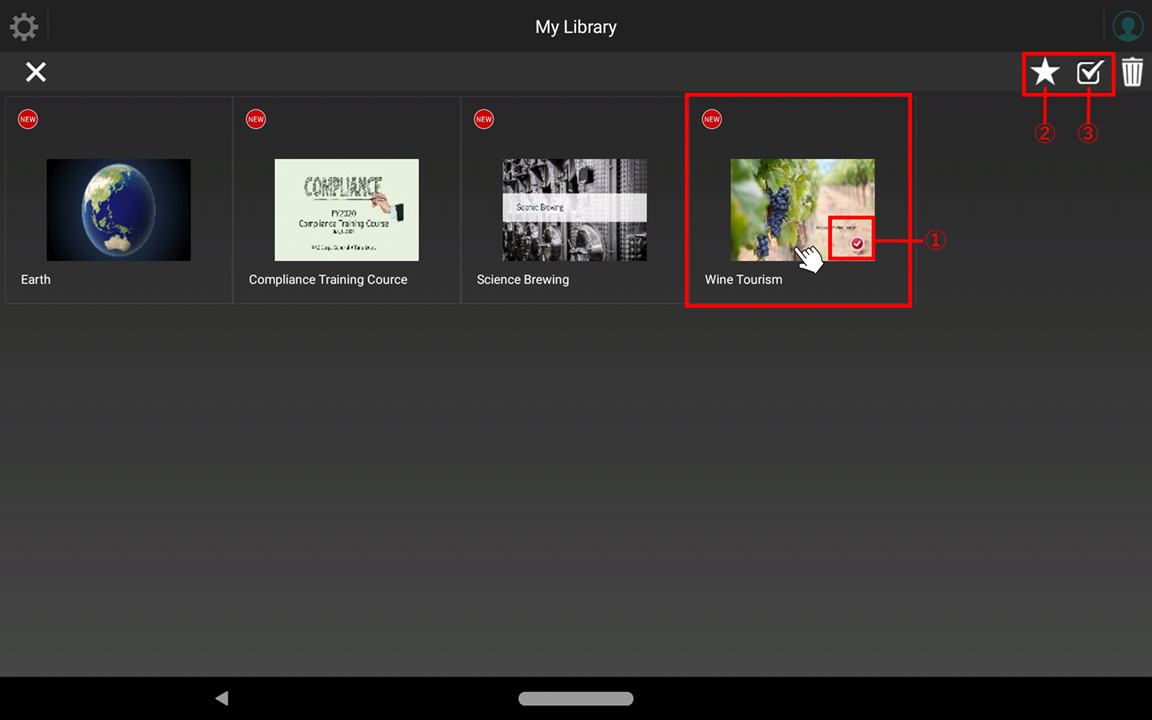
| ① | Selected Icon | It appears on thumbnail when the content is selected. | |
| ② | Favorite Button | To add the content to "Favorite", select this. | |
| ③ | Select All Button | To select all, select this. |
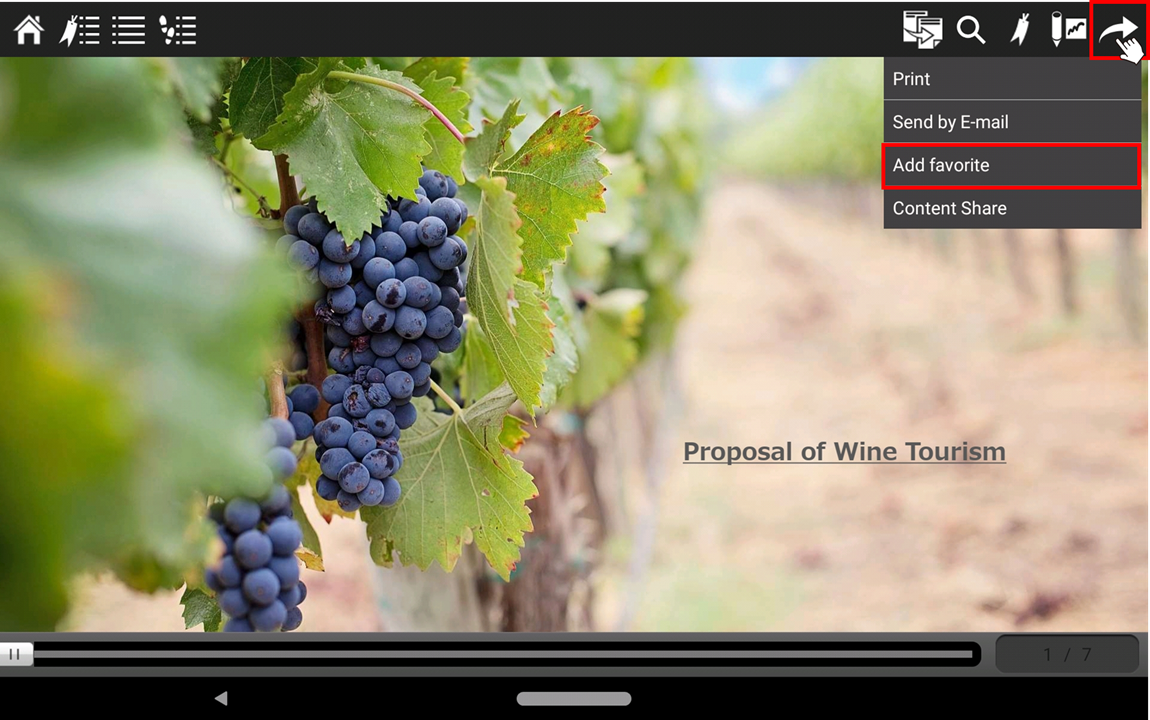
Tap "Favorite" button, then a confirmation shows, and select "OK".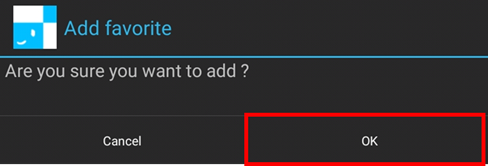
Then, the selected content is added to "Favorite". You can find on "Favorite" screen.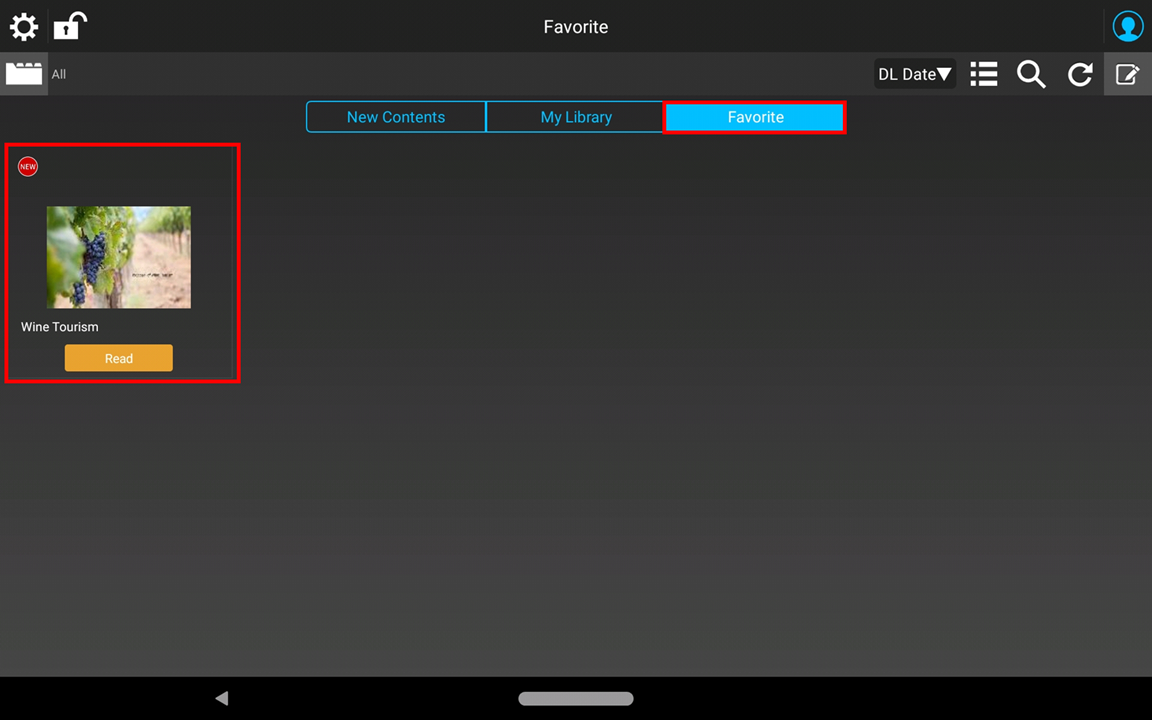
To remove the content from the "Favorite", operate the same way as above on the [Favorite] screen.
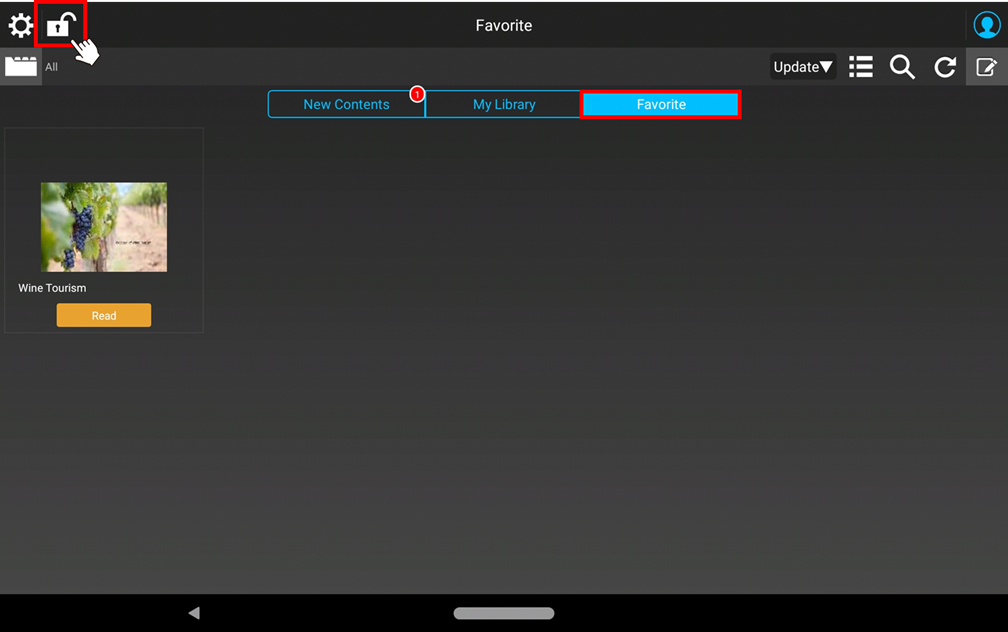
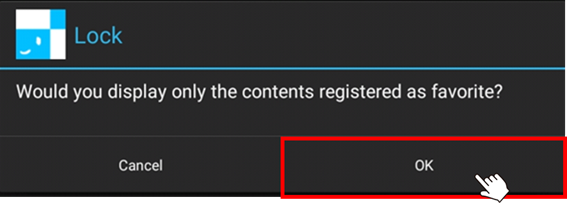
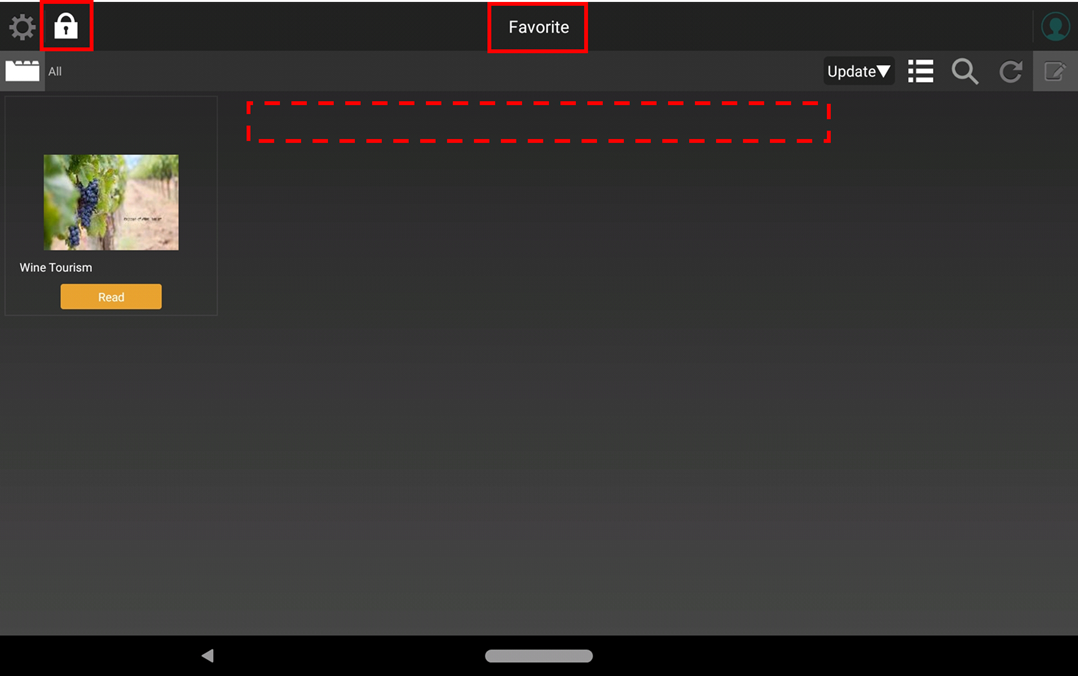
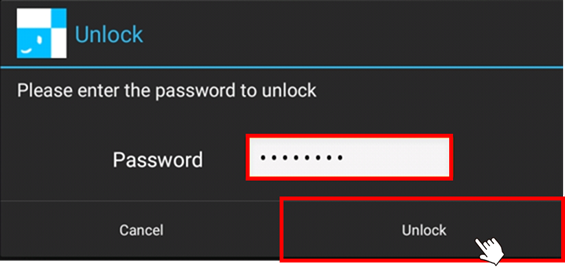
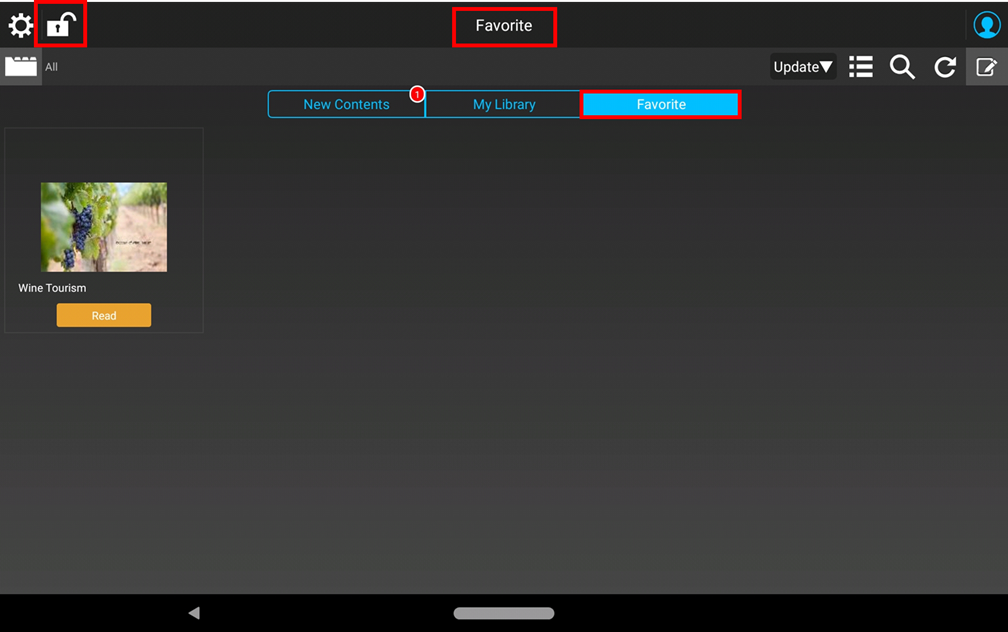
You can lock the screen in the state of displaying the "Favorite". Display the “Favorite” screen, then select the "Lock" button.
5.3 Bookmarking
You can bookmark on any pages of a content. Bookmarks you put on a content is shown as "Bookmark List", and it is useful when you want to open a certain page of the content afterwards.
1. Bookmarking on a Certain Page
Tap anywhere on the screen at the page you want to make a bookmark, and call the operation menu. From the operation menu, select "Bookmark" button.
Then, the bookmark icon turns yellow. Pages with bookmarks are shown with a yellow “Bookmark” button.
2. Open a Certain Page of the Content by Bookmark List
Tap anywhere on the screen, and call the operation menu. From the operation menu, select the "Bookmark list" button. Then the list of bookmarks on the content appears. Select one of them, and the page opens accordingly.
3. Removing of a Bookmark You Made
Tap anywhere on the screen at the page you want to remove a bookmark, and call the operation menu. From the operation menu, select the “Bookmark" button. Then the bookmark made on the page is removed.
5.4 Make Notes on a Page (Memo Function)
You can make notes on a page of a content, and they are saved so as to be reviewed or edited afterwards.
1. Making of a Note
Make a long tap at anywhere on the screen, then a Memo Pad appears. Make note on the pad, then save it.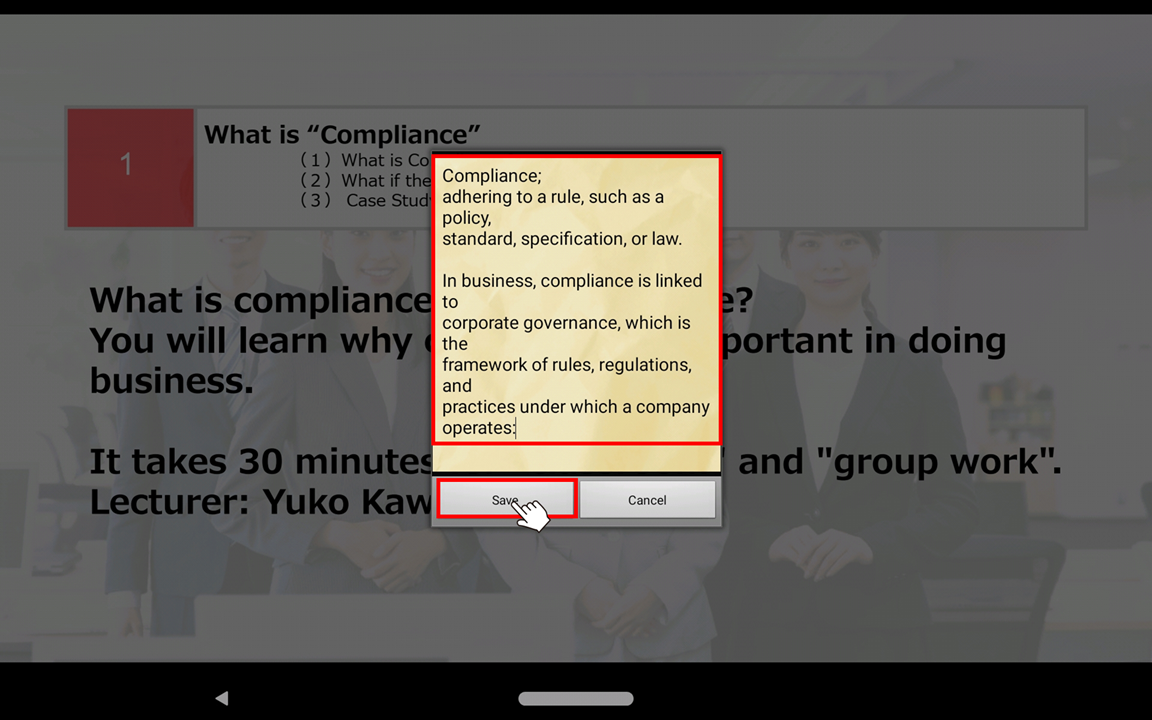
Then a memo icon appears on the page. If you select the icon, the memo opens.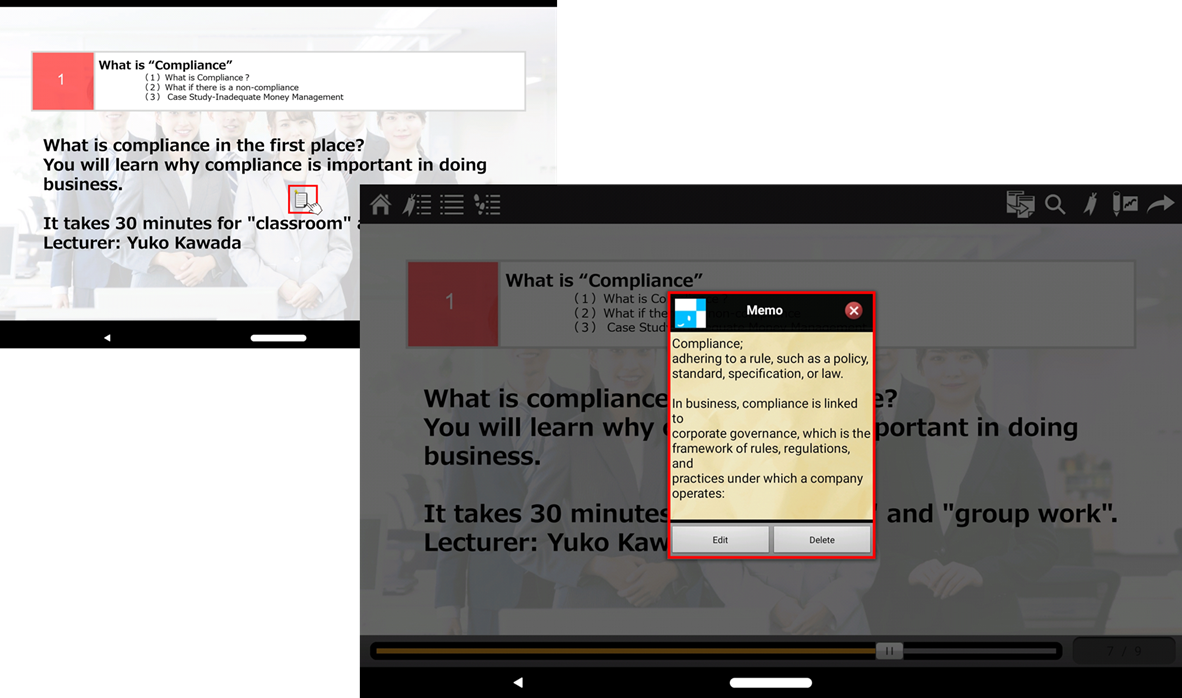
2. Editing of Notes You Made
To edit the memo you made, tap "Edit" button. Functions available for an existing memo are as listed below.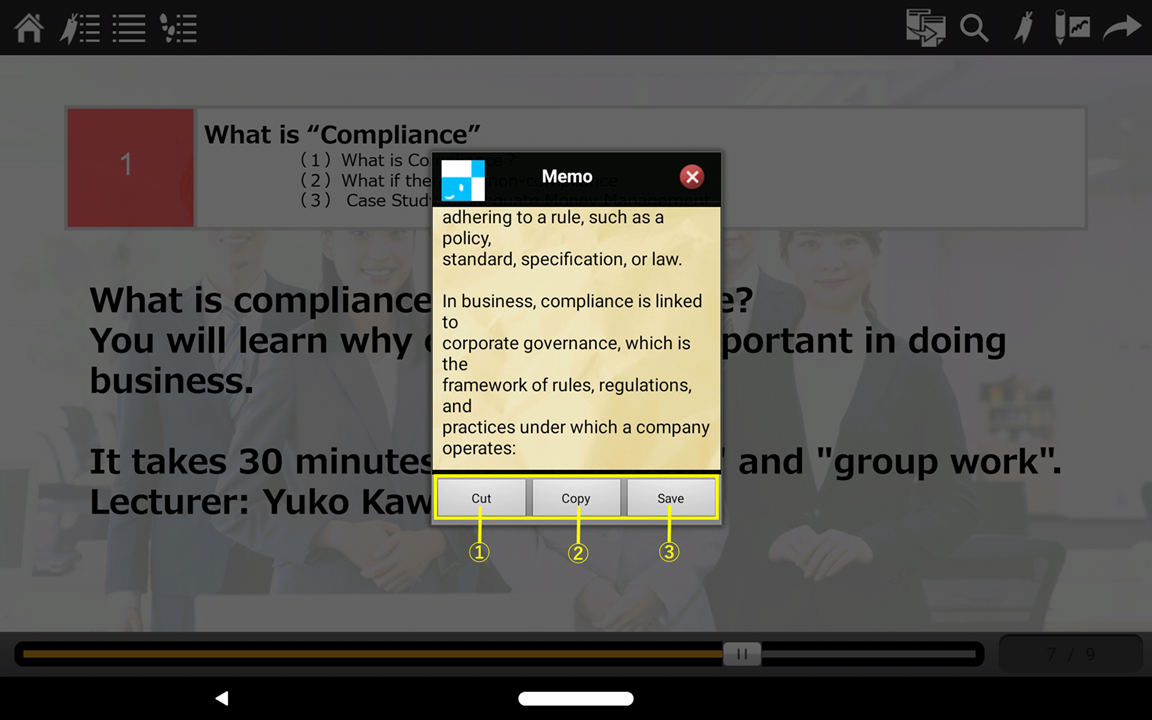
| ① | Cut | To move the position of the note you made, select this. Either of moving within the page or to a different page is available. In addition, moving to a different content is also available. If you select this, then content of the memo is saved on the clip board. |
| ② | Copy | To copy the note you made, select this. If you select this, then content of the memo is saved on the clip board. |
| ③ | Save | To reflect the change you made, select this to save it. |
If you use ② or ③ above, then move to the page or position to paste the memo, and tap anywhere on the page, then following screen appears.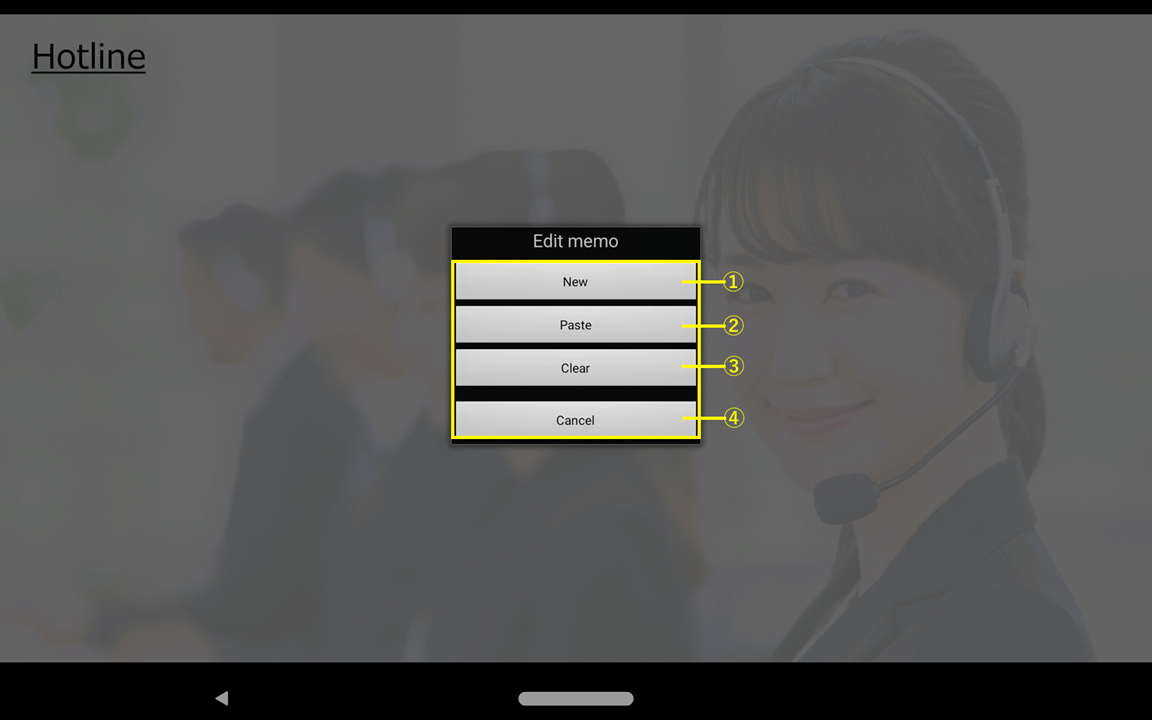
| ① | New | To discard the cut or copied memo, and create new memo, select this. |
| ② | Paste | To paste the memo you cut or copied, select this. |
| ③ | Clear | To discard the cut or copied memo, select this. |
| ④ | Cancel | To cancel, select this. |
3. What if the number of pages of content increases or decreases?
If the editor increases or decreases the number of page of content and republishes it, the memo you have made on a certain page of the content remains at the same page counted from the top. In that case, use "Cut" and "Paste" functions to adjust the position. In addition, due to the decrease of pages, the memos created on the pages where the pages no longer exist will be lost.
4. What if you delete a content which has memo you have made on it?
If you delete a content which has memo you have made on it, then memo is also lost.
5.5 Content Search
You can search a content by some conditions. Downloaded content and undownloaded content require separate search. Performing a search on [New Content] screen for undownloaded contents, and on [My Library] for downloaded contents. Also, the following 2 searches require separate search;
1. Finding of contents that include search word
2. Finding of pages of a content that include search word
1. Finding of Contents that Include Search Word
On [New Content] or [My Library] screen, tap "Search" button to perform a content search.
Then, the search bar appears. Enter keyword for a search. 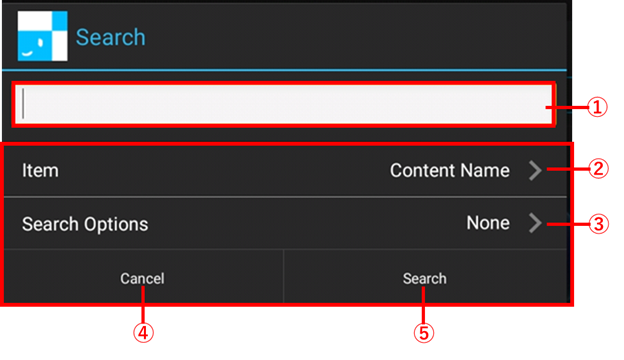
| ① | Search Bar | Enter keyword for a search. A search is performed under exact match condition ,so a search performed with several keywords such as "AND Search" or "OR Search" are not available. A search is performed by the keyword you enter here, and following conditions of ② and ③. |
| ② | Item |
Select the search target from ②-1 to ②-3 below. |
| ③ | Search Option |
Select the range of a search from ③-1 and ③-2 below. |
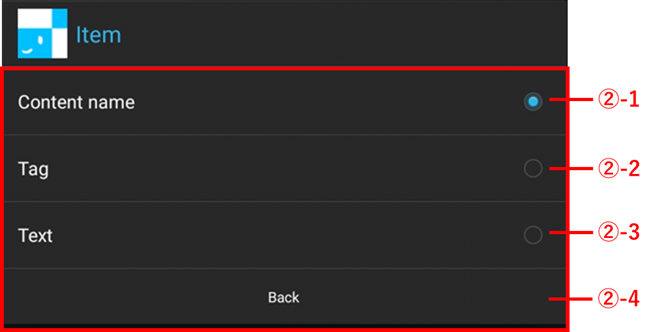
| ②-1 | Content Name | If you want to perform a search by "Content Name", select this. |
|
②-2 |
Tag | If you want to perform a search by "Tag", select this. |
| ②-3 | Text | If you want to perform a search by "Content Body", select this. This item is available only for downloaded contents. |
| ②-4 | Back Button | To return to the previous window, tap this. |
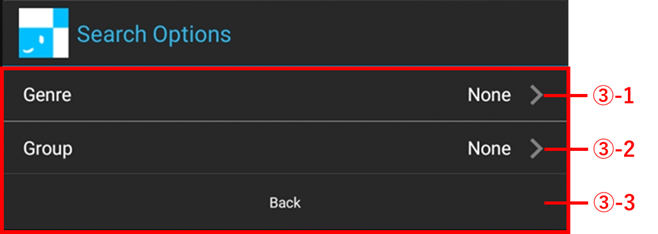
| ③-1 | Genre | If you want to perform a search in a certain genre, select this. Then the input bar appears, so specify the genre name. |
| ③-2 | Group |
If you want to perform a search in a certain group, select this. Then the input bar appears, so specify the group name. |
The result of a search appears as below.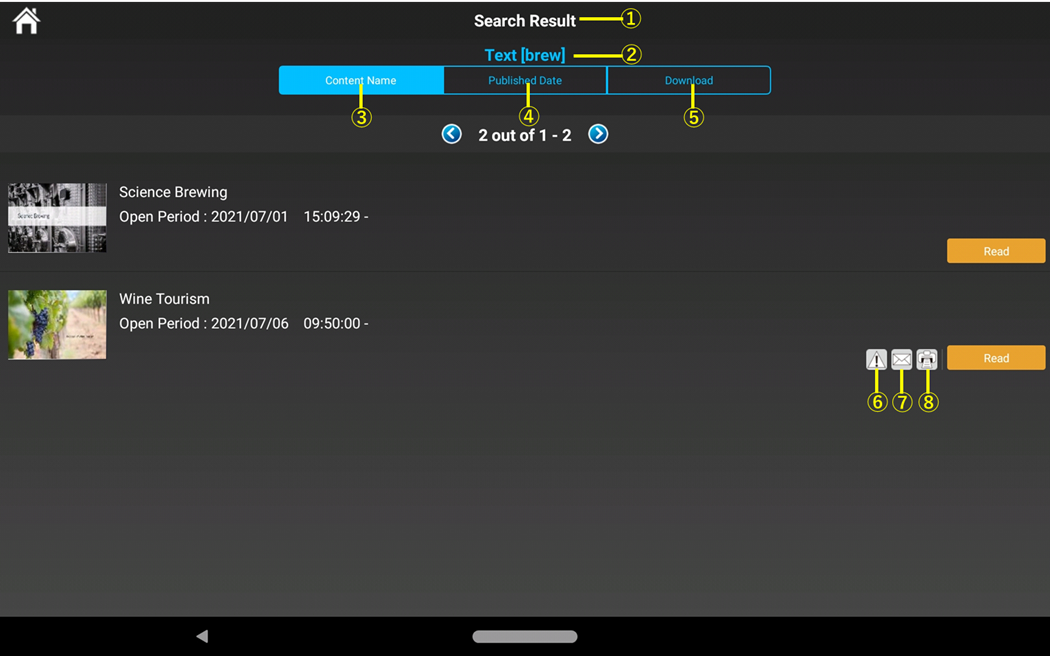
| ① | - | Search Result | It shows which screen you are viewing currently. |
| ② | - | Target [keyword] | It shows the "Search Target" and "Keyword" used for the search. In this case, a search has performed targeting the content body, and the keyword has been "brew". |
| ③ | - | Content Name | If you want to sort the result by "Content Name", select this. Only ascending order is available. |
| ④ | - | Published Date | If you want to sort the result by "Published Date", select this. Only ascending order is available. |
| ⑤ | - | Download | If you want to sort the result by "Downloaded Date", select this. Only ascending order is available. |
| ⑥ | Warning | This icon appears when the content has "Warning Message" set by the content creator, or it requires the user's password when opening the content. | |
| ⑦ | This icon appears when the content is allowed to be sent by e-mail. | ||
| ⑧ | This icon appears when the content is allowed to be printed. |
2.Finding of Pages of a Content that Include Search Word
As the result of searching 1. above, you have found 2 contents include "Brew" as the content body. Then the following is how to find the pages of content that includes the search word.
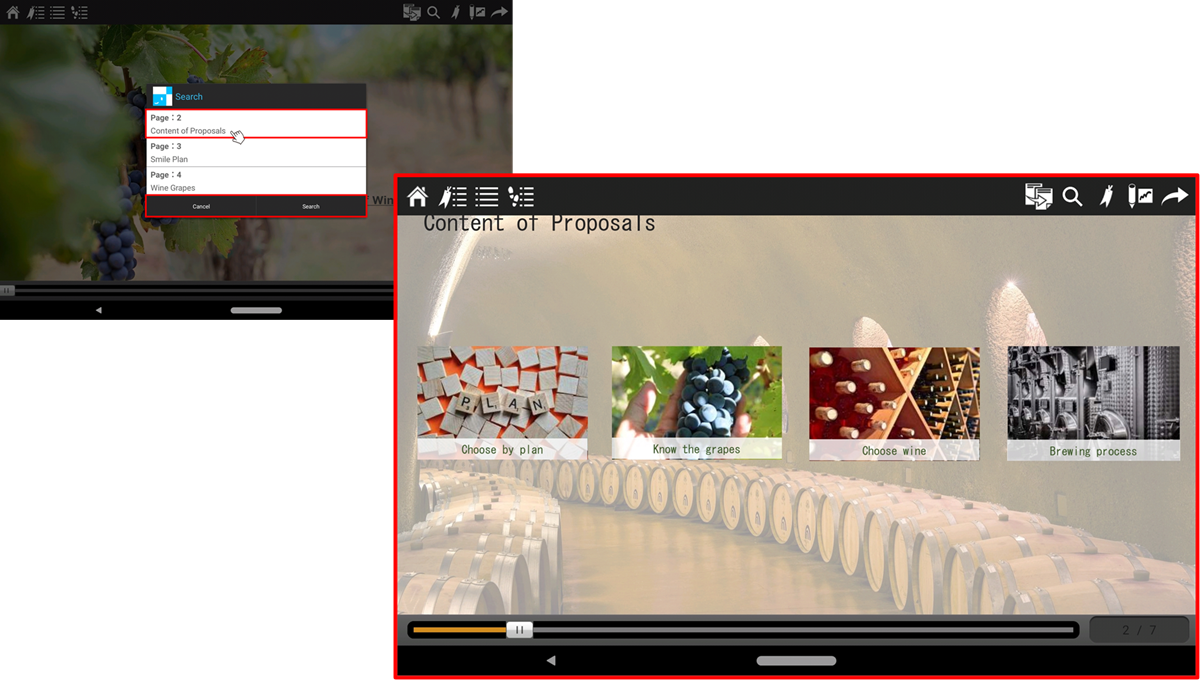
Tap "Read" button to open the content, then the content description window appears, so tap "Read" on the window. 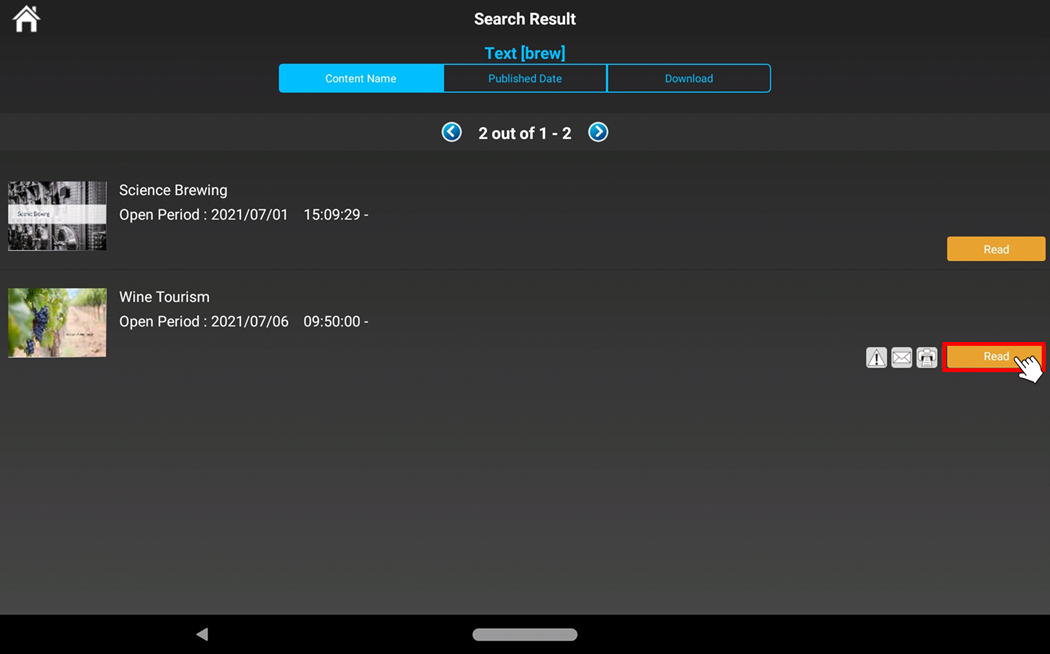 Tap anywhere on the screen to call the operation menu. From the operation menu, select "Search" button. Then the search bar appears, and enter the search word and tap "Search" button. A search is performed under exact match condition ,so a search performed with several keywords such as "AND Search" or "OR Search" are not available.
3. Narrowing Down of Contents by "Genre" and "Group"
Every single content belongs to a "Genre". A user with Content Admin role creates "Genre" structure, and when an editor creates and publishes a content, specifying a "Genre" to the content is mandatory. By default, a content is automatically given a genre with "unspecified". So you can use "Genre" as a condition for narrowing down contents when you want to search a content. On the other hand, the editors publish contents to "Group". The contents that you can view on [New Contents] or [My Library] are that of being published to the "Group(s)" you belong to. So you can also use "Group" as a condition for narrowing down contents. Downloaded content and undownloaded content require separate narrowing down, means that of on [New Content] screen for undownloaded contents, and on [My Library] for downloaded contents.
Narrowing Down by "Genre"
<Condition>
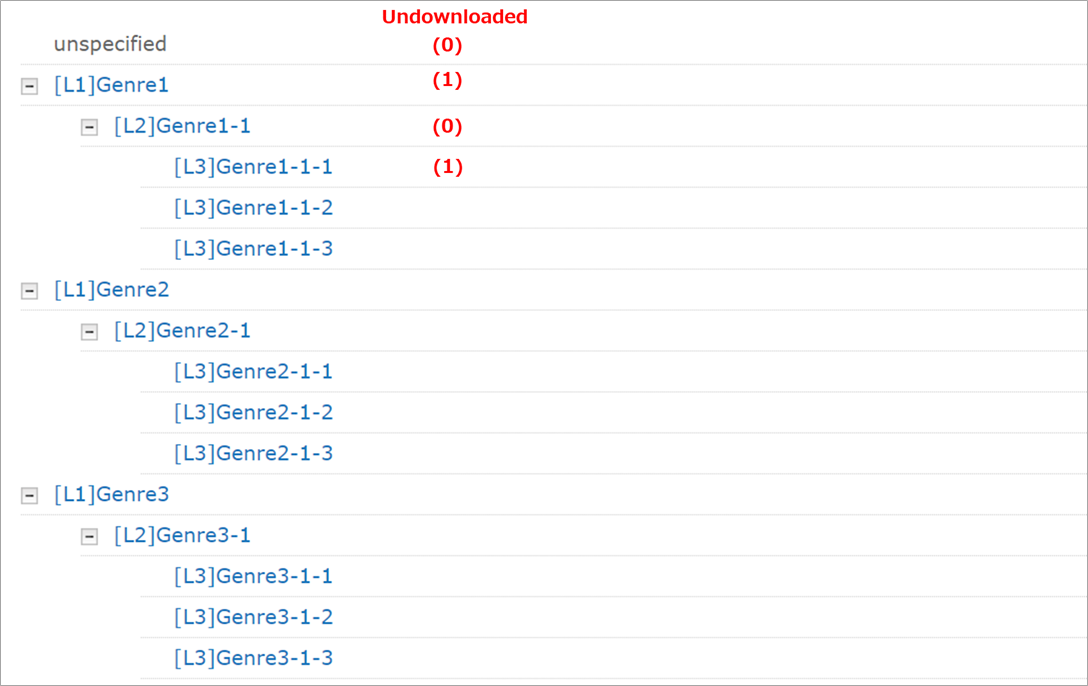
An admin has published several contents by categorizing them by Genre as below.
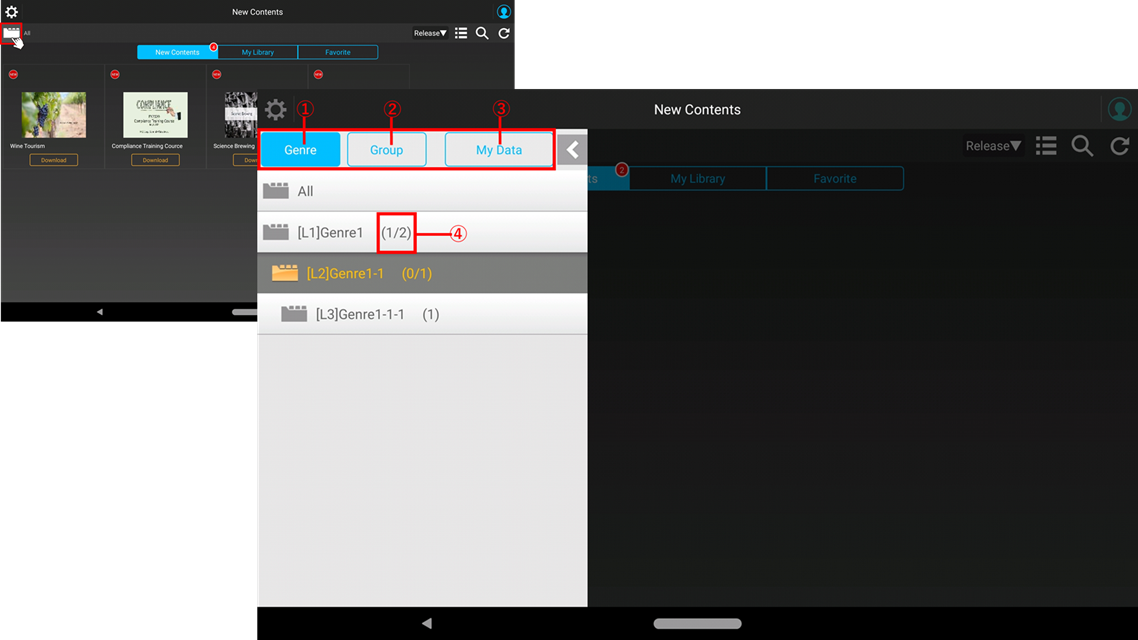
| ① | Genre | To narrow down contents by genre, tap this. Genre is selected by default when you open "Side Menu". |
| ② | Group | To narrow down contents by group, tap this. |
| ③ | My Data |
To narrow down contents by "My Data", tap this. The following items are called "My Data";
|
| ④ | figure/figure | It shows the total number of contents in the root genre or that of child genres belong to the root. In this case, there are 2 contents under "[L1]Genre1" root tree, and 1 content out of 2 is immediately in "[L1]Genre1" folder, and the other is in "[L3]Genre1-1-1". |
Narrowing Down by "Group"
<Condition>
An admin has published several contents to designated groups as below.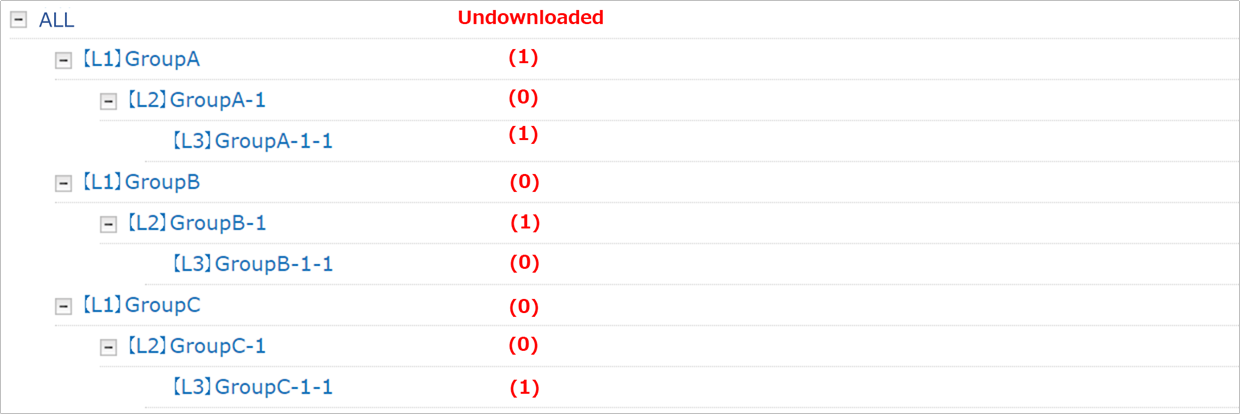
Tap "Folder" icon on the screen, then "Side Menu" appears. Select "Group".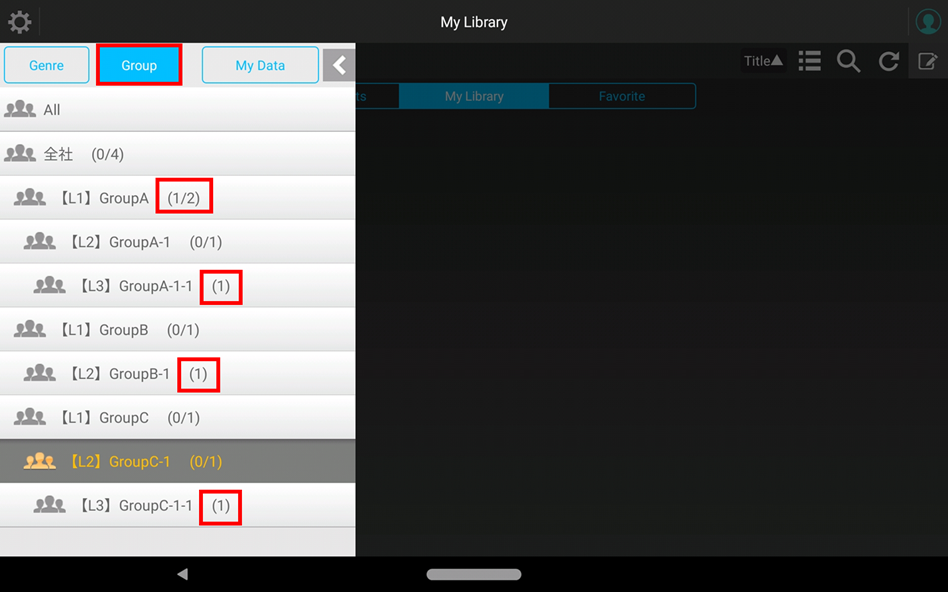
In this case, there are 2 contents under "【L1】GroupA" root tree, and 1 content out of 2 is immediately in "【L1】GroupA" folder, and the other is in "【L3】GroupA-1-1" folder. With the same manner, there is 1 contents under "【L1】GroupB" root tree, and the content is in "【L2】GroupB-1", there is 1 contents under "【L1】GroupC" root tree, and the content is in "【L3】GroupC-1-1".
Tap on the screen, then the result of narrowing down appears.
| ① | Group Icon | This icon appears when you narrow down contents by group. Tap this if you want to select another group to narrow down, or change the condition for narrowing down. | |
| ② | - | Folder Tree | It shows where you are in "Group Tree". |
4. Finding of Contents that Include "My Data"
Tap "Folder" icon on the screen, then "Side Menu" appears. Select "My Data" to find contents with "Bookmark", "Memo", or "History". This function works only for downloaded contents.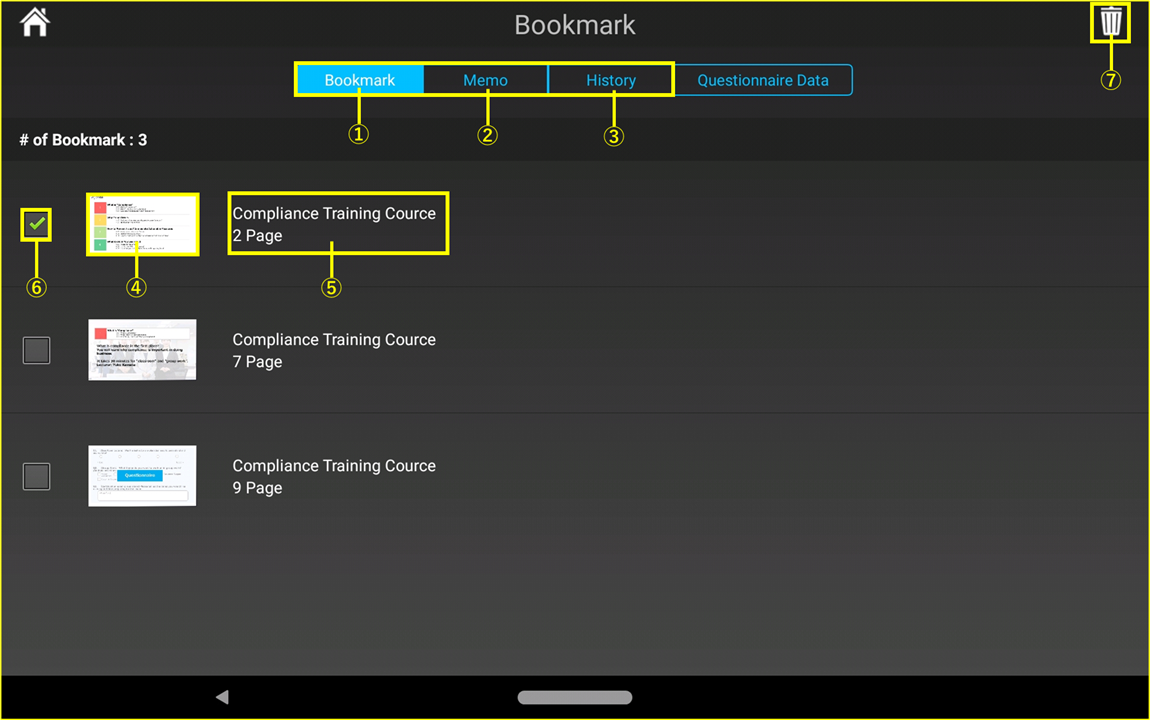
| ① | - | Bookmark | To find contents with "Bookmarks", tap this. |
|
② |
- | Memo | To find contents with "Memo", tap this. |
| ③ | - | History | To find contents that have been viewed before, tap this. The latest 50 records are listed. |
| ④ | - | Thumbnail | Thumbnail of the page |
| ⑤ | - | Detail | Content name and the number of page |
| ⑥ | Checkbox | To select the item, turn ON this check box. | |
| ⑦ | Trashcan | To delete data such as bookmarks, memo, or viewing history of the selected items, tap this. |
You can select items that are recorded on "History" from "History Settings" of "Setting Menu".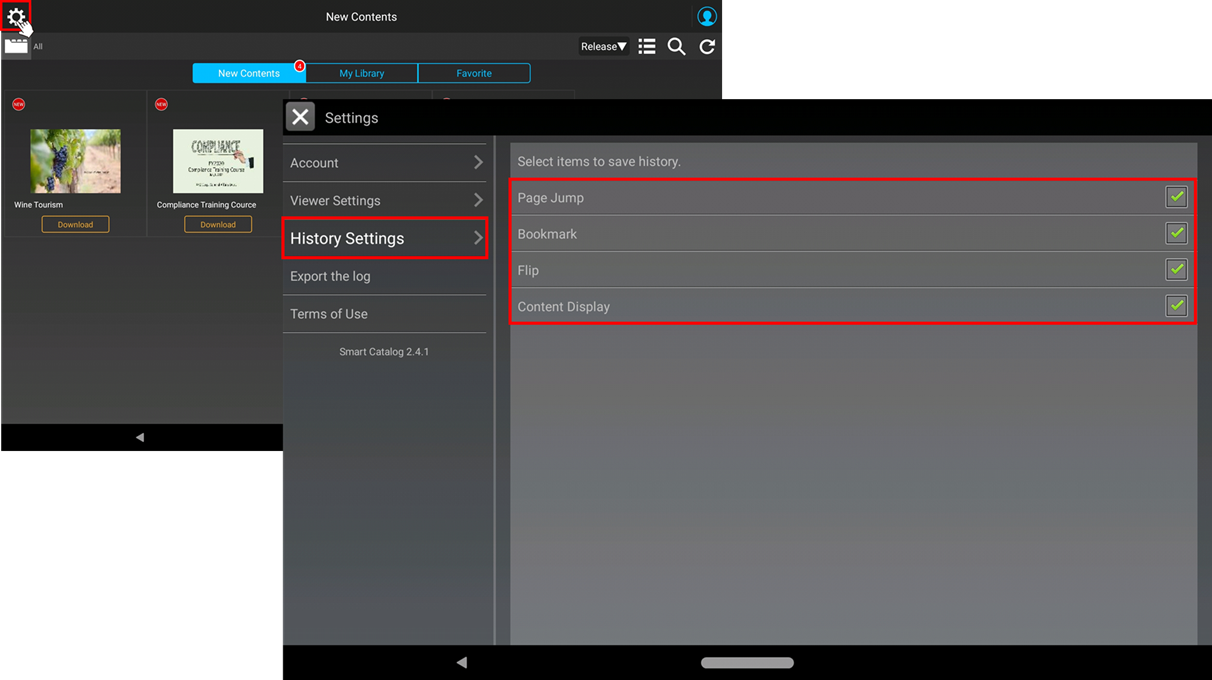
5. Confirming of the Result of Submitting for Questionnaire Forms
You can also confirm the result of submitting for questionnaire forms on "Questionnaire Data" screen.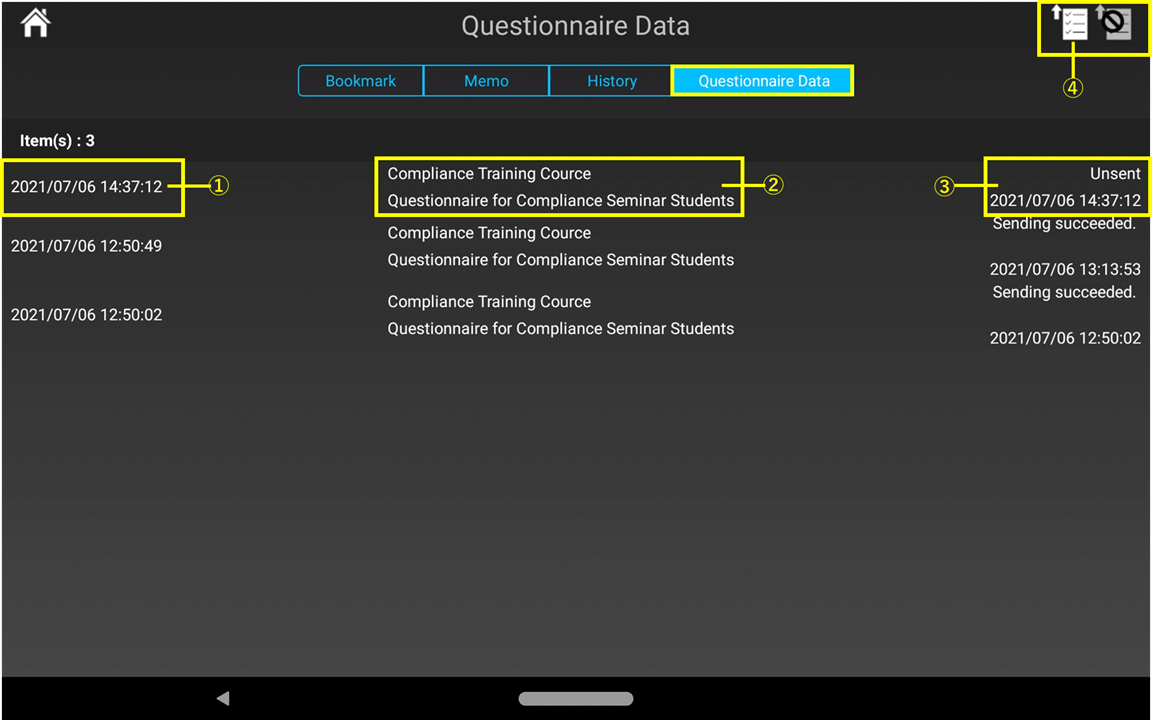
| ① | - | Submit Date | It shows the date and time when the "Submit" button of a questionnaire form was tapped. |
| ② | - | Detail | Content name and form name |
| ③ | - | Result | It shows the date and time of the result of submit at ① above. If the submit succeeds, the result will be "Sending succeeded". If the submit is performed under offline or under bad communication, then the result will be "Unsent". |
| ④ | Retry Button | This button appears when "Unsent" form exists. When the network communication turns available, unsent data will be automatically sent, but if you want to send it manually, tap this button. |
5.6 Printing *Optional
You can print the content using a printer which is connected to the same network segment with the Android device that is using Smart Catalog. The print range is only the PDF on which the content is based. Various objects attached using the authoring tool are not within the print range.
1.Open the content and tap anywhere on the screen to call the operation menu. Select the "Share" button from the operation menu. Then tap "Print".
If the content is not allowed to be printed by the content editor, “This content has been limited use of cloud printing." appears, to notify that the content is not allowed for printing.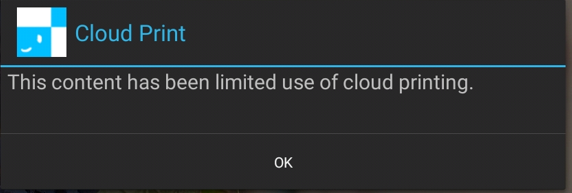
2. If the device you are using does not have "Google Cloud Print" app, then the following message appears. Tap "OK", then it opens "Google Play" screen. 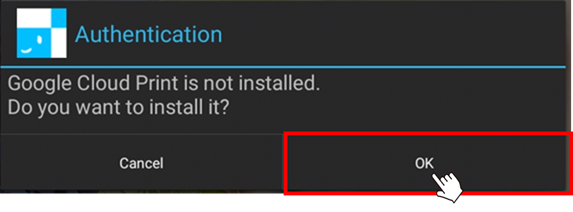
Tap "Install" to install the app.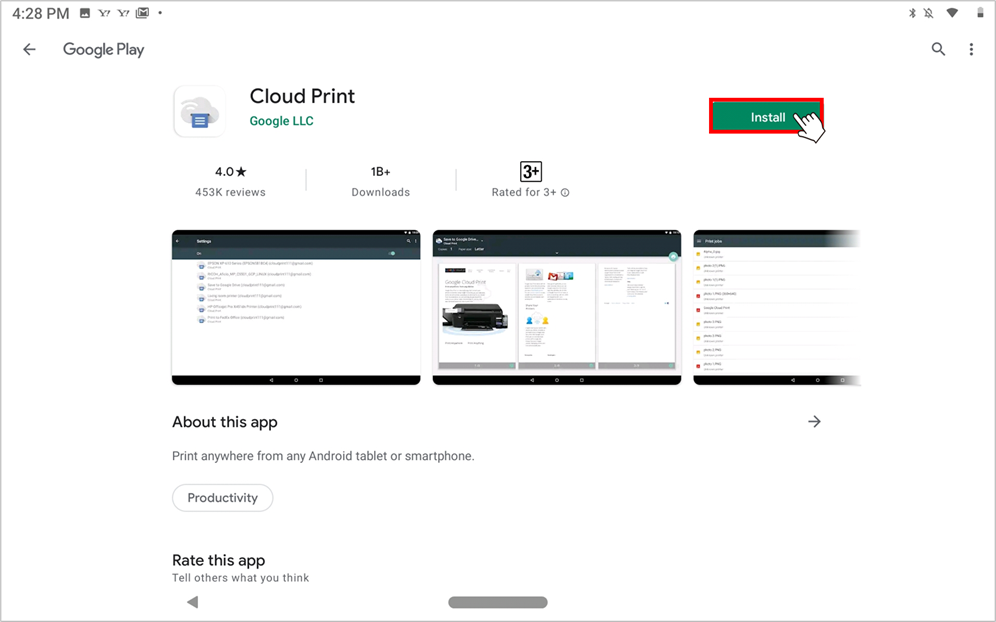
4 After the application of Google cloud print is started, please follow the instructions.

Memo
- In the case of content which the printing is not allowed, the message "This content is has been limited use of cloud printing." is displayed.
- The printable objects are only the PDF files which are used for the base of the contents. Buttons or images which are set by using authoring tool cannot be printed.
5.7 Sending Content by Email *Optional
You can use the email sending function of your Android device to attach a content (PDF format) to an email and send it. Only the PDF on which the content is based can be sent by email. Various objects attached using the authoring tool are not subject to sent by email.
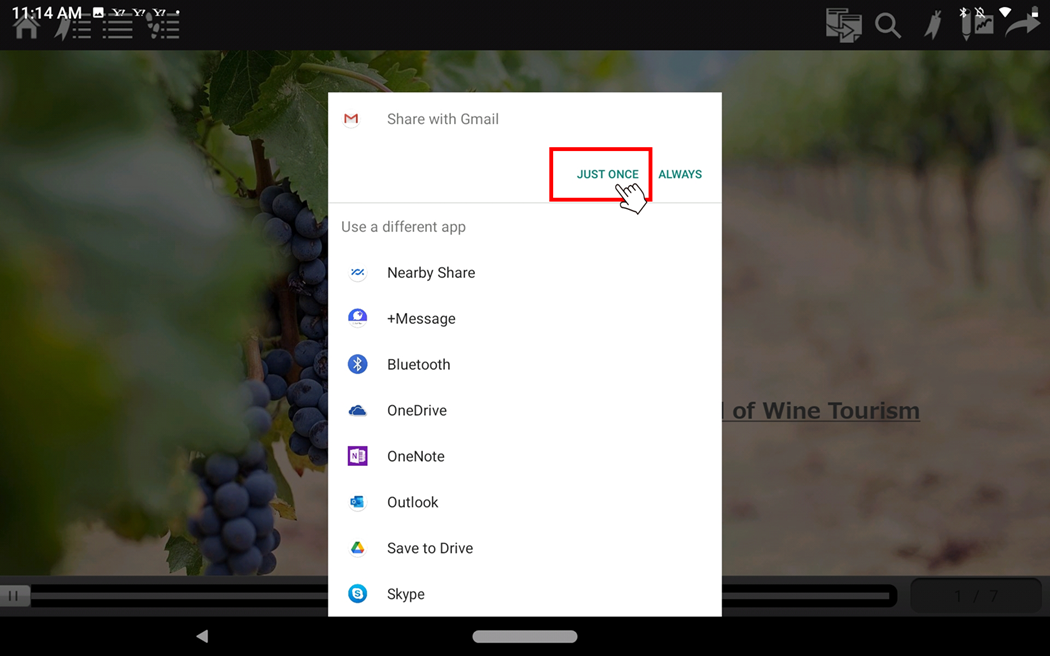
1. Open a content and tap anywhere on the screen to call the operation menu. Select the "Share" button and “Send by E-mail” button from the operation menu.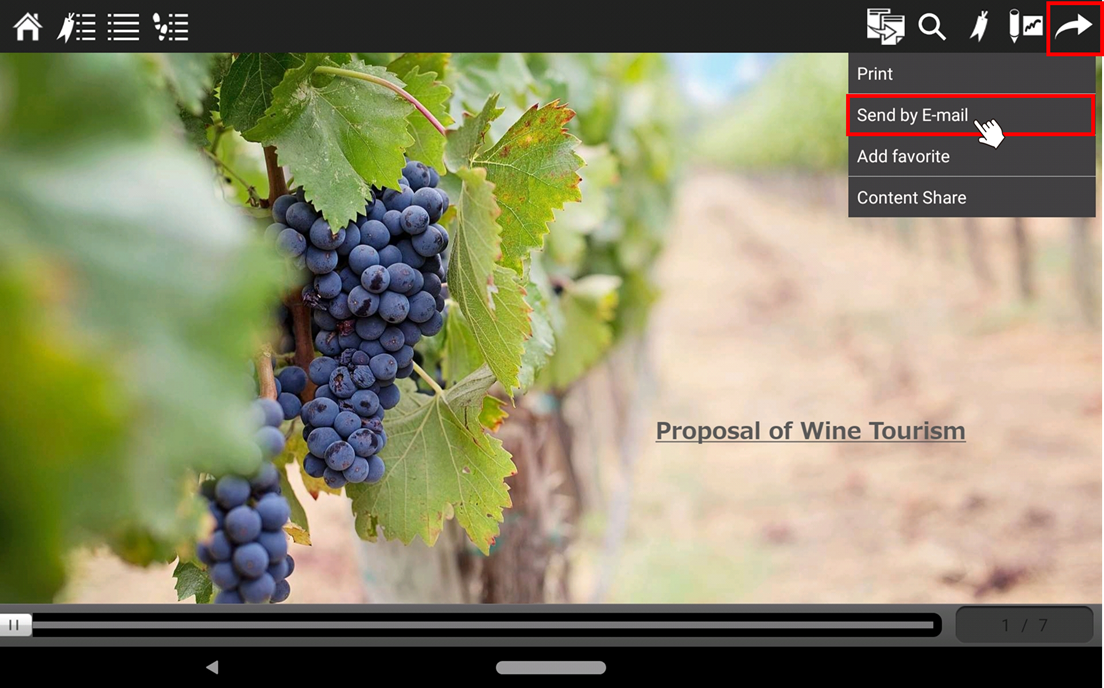
If the content is not allowed to be sent by E-mail by the content editor, “Sending by e-mail is not allowed for this content.“ appears.
2.A confirmation appears. Tap “OK”.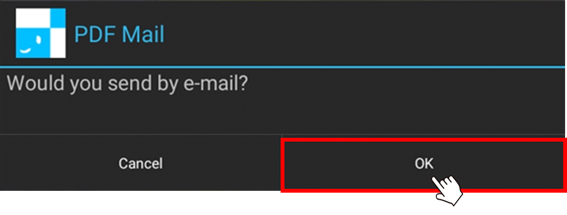
3. The "Send by e-mail function" of Smart Catalog launches the available applications to share the PDF. To send by e-mail, select a mail application. The following screen differs depending on the type of device you are using.
Applications that can use the sharing function of Android are displayed as candidates. For details, please contact the email software company.
4.Specify "To", and click "Send".
There is no upper limit for the size of a PDF file that can be attached to an email. However, if the maximum size of the attachment is limited by the mailer of your device, that size will be applied. The PDF size here refers to the one that has been converted as a distribution file. It may be larger than the size of the original PDF file that the content creator has uploaded to the content management system as a resource.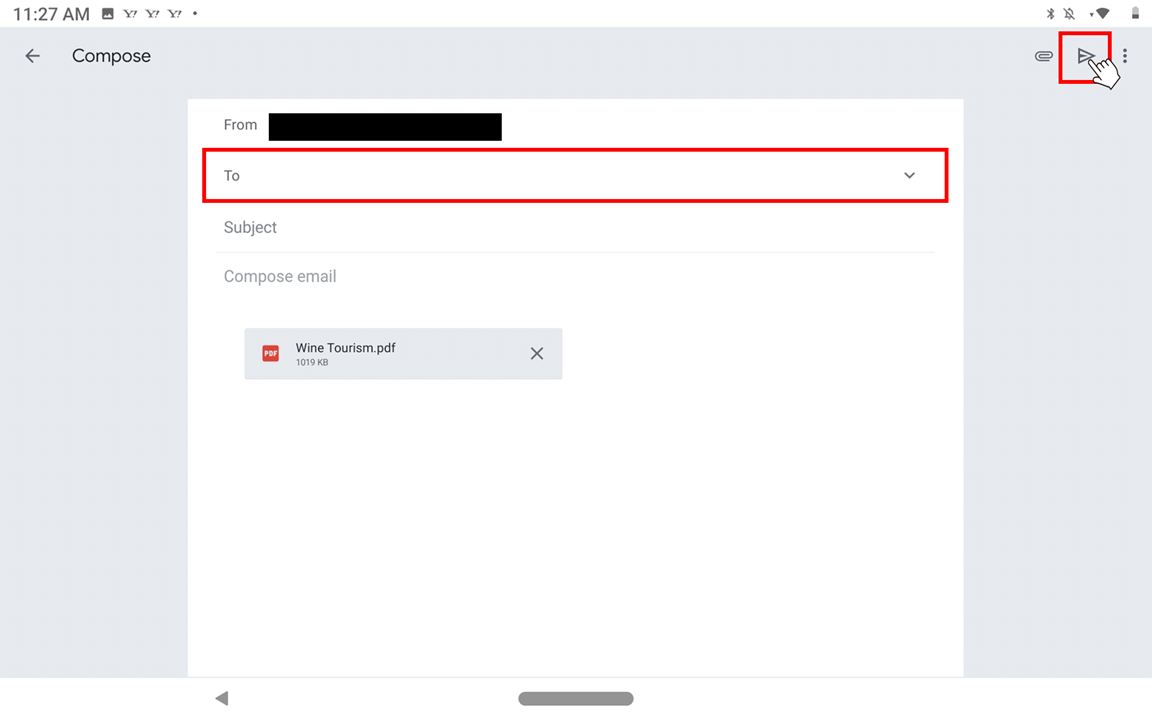
5.8 Content Sharing Function *Optional
You can share a content with a person without a Smart Catalog user ID by using “Content Sharing Function” if the content creator allows the use of “Send by e-mail function”. The content shared by this function can be viewed on a web browser without the user authentication.
1.Open a content and tap anywhere on the screen to call the operation menu. Select the "Share" button and “Content Share” button from the operation menu.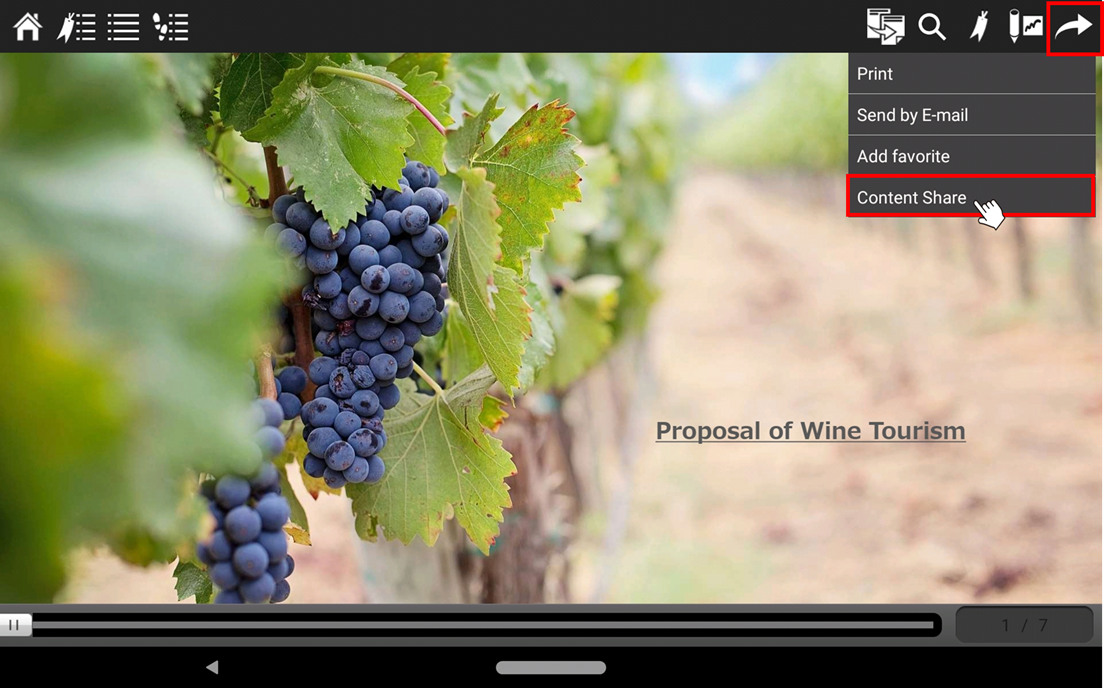
If the content is not allowed to be shared by the content editor, “Sending by e-mail is not allowed for this content.“ appears.

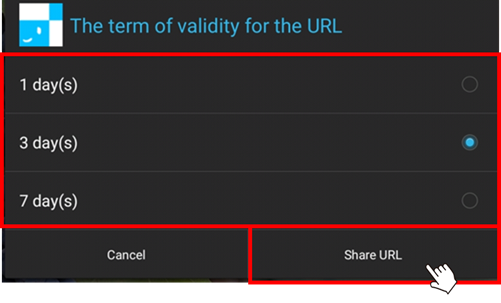
2.A message appears and asks how long the URL for content sharing will be valid for. So select either “1 day” “3 days” or “7 days”, and tap “Share URL”.
3.Then a URL for content sharing is issued accordingly.
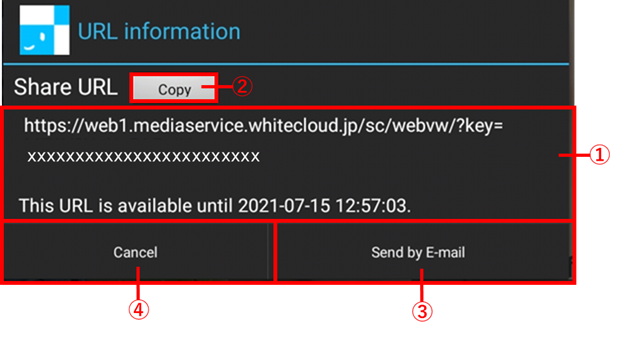
|
① |
URL |
This URL opens the shared content on a browser during the period you have specified above. After the period ends, this URL will expire. |
|
② |
Copy Button |
To copy the URL, tap this. The URL is saved to the clipboard. |
|
③ |
Send by E-mail Button |
To send the URL by e-mail, tap this. Then the screen to launch a mail application appears. |
|
④ |
Cancel Button |
To cancel and exit from the content sharing mode, tap this. |
4. Select the method to share the URL and send it to the person you want to share the content with.
5. The person who received the content sharing URL, tap the URL to open the content.
Mail applications that can use the sharing function of Android are displayed as candidates. For details, please contact the email software company.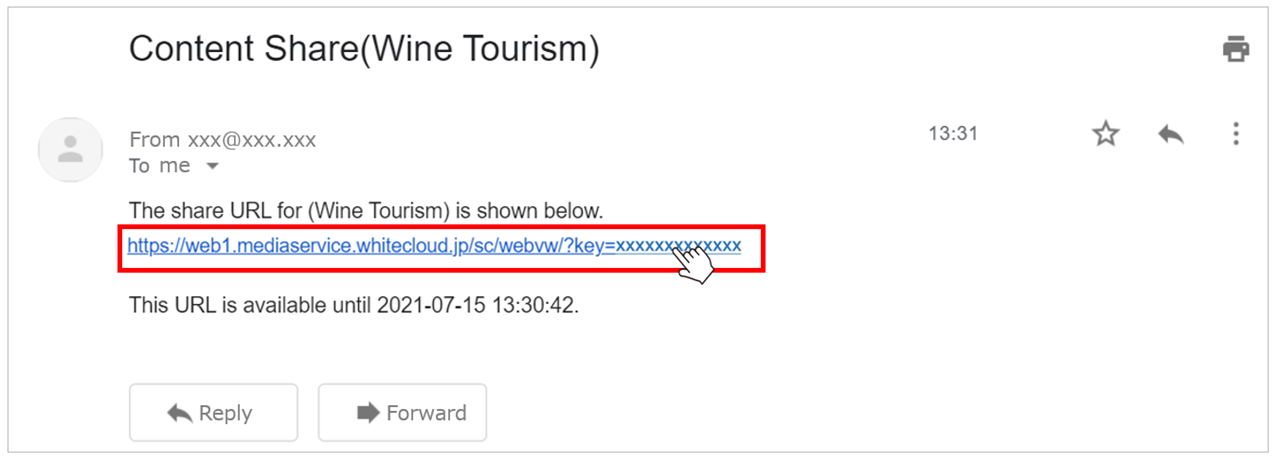
6. The content will open on a browser.
5.9 Reviewing content *Optional
You can review a content and feedback your review to the content creator by putting stars or making comments about the content if the creator allows the use of “Review function”. The comments for the content are also referred to by other viewers on the “Content Detail” screen.
1. Tap the thumbnail of a downloaded content, then the “Content Detail” screen is opened. If it opens the content itself instead of opening the “Content Detail” screen when you tap a thumbnail, it means the setting for displaying “Content Detail” screen is not activated. Please turn “ON” for it on the “Viewer Setting” screen.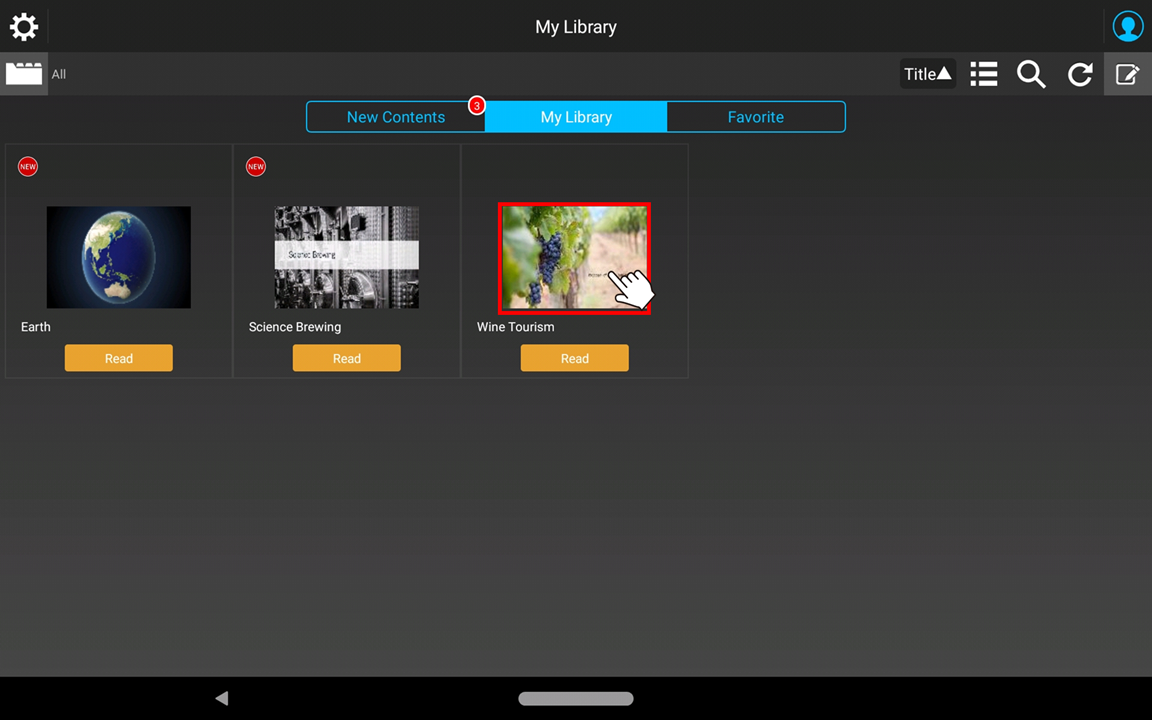
Then, the following "Content Detail" screen appears.
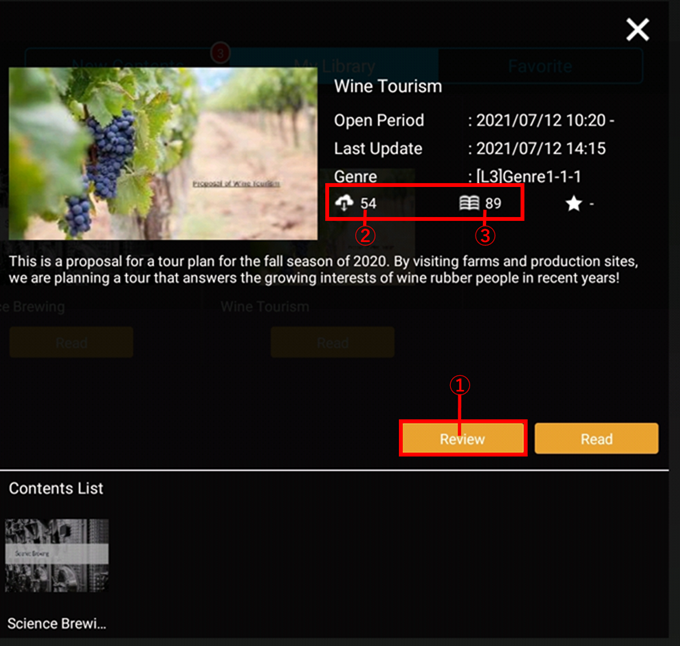
| ① |  |
Review | To make your review for the content, click this. |
| ② | # of D/L | It shows how many times the content has been downloaded by the users of your contracted environment. This value is aggregated daily. | |
| ③ | # of Viewed | It shows how many times the content has been viewed by the users of your contracted environment. This value is aggregated daily. |
2. Tap "Review" button to open the review screen.
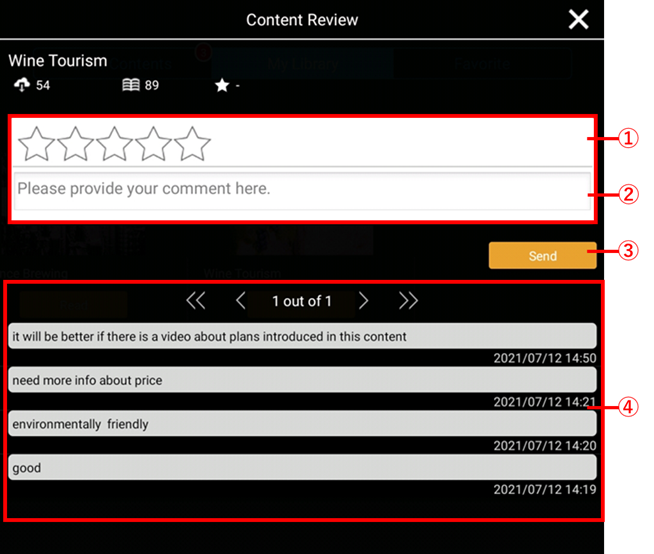
| ① | - | Star Rating | To put stars to rate the content, tap here. Star rating is available only once per content. If you want to make another star rating, delete the content and download it again. Result of the star rating is only available for the admin user. |
| ② | - | Comment Column | To leave a comment for the content, enter here. You can leave your comment for multiple times. |
| ③ |  |
Send Button | To send the comment you made, tap here. If your device is offline, the comment will be sent when your device will be online. |
| ④ | - | Viewers' review | It shows the 10 latest other viewers' comment for the content. |
Only at the first time viewing, the following screen appears before closing the content.

| ① | OK | To make a star rating or comment, tap this. Then the review screen appears. |
| ② | Cancel | To close the content without reviewing, tap this. Then it returns to "My Library" screen. |